# 背景
我们将从头开始重写react,遵循真实的React代码架构,没有优化和非必要功能。
如果您读过我之前的build your own React,不同之处在于这篇文章基于 React16.8,所以我们现在可以使用hooks并删除与class相关的所有代码。
你可以在 Didact 存储库中找到旧博客文章和代码的历史记录。还有一个演讲涵盖了相同的内容。但这是一个独立的帖子。
# 目录
- Step0: Review(回顾)
- Step1: The createElement Function(createElement 函数)
- Step2: render Function
- Step3: Concurrent Mode (并行模式)
- Step4: Fibers
- Step5: Render 和 Commit 阶段
- Step6: Reconciliation (协调算法)
- Step7: Function Components(函数组件)
- Step8: Hooks
# 详细
# Step0: Review(回顾)
我们先回顾一些基本概念,如果你对React、JSX、DOM元素的工作原理比较了解,你可以跳过这一步。
我们将使用以下三行代码的定义一个React App。
const element = <h1 title="foo">Hello</h1> // 定义一个react元素
const container = document.getElementById("root") // 从DOM 中获取了一个 DOM node
ReactDOM.render(element, container) // 将 React 元素渲染到容器中
2
3
下一步我们将react代码替换成普通的javascript代码。
在第一行中,我们用JSX定义的React元素,这不是合规的js代码,因此我们要将其转换成合规的js代码。
JSX 通过Babel等构建工具转换为JS。转换过程通常很简单:将标签(tags)代码替换成createElement的调用,并将标签(tag)名、props 和 children 作为参数传入。
const element = React.createElement(
  "h1",
  { title: "foo" },
  "Hello"
)
2
3
4
5
React.createElement 根据参数创建对象。除了一些验证之外,这就是它所做的全部工作。因此,我们可以放心地将函数调用替换为其输出。
const element = {
  type: "h1",
  props: {
    title: "foo",
    children: "Hello",
  },
}
2
3
4
5
6
7
以上就是一个React Element ,一个具有两个属性(type与props)的对象。(好吧,它还有更多,但我们只关心这两个)。
这个type是一个字符串,它指定了我们要创建DOM node节点的类型,tagName是你想要通过document.createElement创建HTML元素时传递给它的字符串;它也可以是个函数,但我们将它留给Step7
props是另一个对象,它具有JSX属性中的所有键和值。它还具有特殊属性:children。
children在本例中是一个字符串,但它通常是一个包含更多elements的数组。这就是为什么elements也是树。
我们需要替换的另一段React代码:ReactDOM.render。
render是 React 更改 DOM 的地方,所以让我们手动实现dom的更新。
首先我们使用element type属性创建了一个 DOM node ,在这个例子中是h1 。
然后我们将所有 element props 分配给这个DOM node,在这里是只有一个 title。
const node = document.createElement(element.type)
node["title"] = element.props.title
2
TIP
为了避免混淆,我将使用 “element” 来指代 React元素,使用 “node” 来指代 DOM 元素。
然后,我们为子节点创建节点。我们只有一个字符串作为子节点,所以我们创建了一个文本节点。
const text = document.createTextNode("")
text["nodeValue"] = element.props.children
2
使用textNode而不是设置innerText,接下来我们以后以相同的方式处理。还要注意我们如何设置nodeValue标题,这个过程与给 h1 设置 title props类似,这就像是字符串中带有这样一个 props: {nodeValue: "hello"}。
最后,我们将textNode 添加至 h1,将h1添加至 container 。
现在我们有了和以前一样的app,但没有使用React。
const element = {
type: "h1",
props: {
title: "foo",
children: "Hello",
},
}
const container = document.getElementById("root")
const node = document.createElement(element.type)
node["title"] = element.props.title
const text = document.createTextNode("")
text["nodeValue"] = element.props.children
node.appendChild(text)
container.appendChild(node)
2
3
4
5
6
7
8
9
10
11
12
13
14
15
16
17
18
# Step1: The createElement Function(createElement 函数)
让我们从另一个app重新开始。这一次,我们将用我们自己的React版本替换官方React代码。
我们将编写自己的 createElement。
让我们将 JSX 转换为 JS,这样我们就能实现 createElement 函数的调用了
正如我们在上一步中看到的,element是带有 type 和 props的对象。我们的函数唯一需要做的就是创建该对象。
const element = React.createElement(
  "div",
  { id: "foo" },
  React.createElement("a", null, "bar"),
  React.createElement("b")
);
2
3
4
5
6
我们使用扩展运算符处理props,children使用rest参数语法,这样children将始终是一个数组。
function createElement(type, props, ...children) {
  return {
    type,
    props: {
      ...props,
      children,
    },
  }
}
2
3
4
5
6
7
8
9
举例:
- createElement("div") 返回:
{
  "type": "div",
  "props": { "children": [] }
}
2
3
4
- createElement("div", null, a)
{
  "type": "div",
  "props": { "children": [a] }
}
2
3
4
- createElement("div", null, a, b)
{
  "type": "div",
  "props": { "children": [a, b] }
}
2
3
4
数组children还可以包含字符串或数字等原始值。因此我们为所有不是对象的内容创建一个独立的元素,并为其创建一个特殊的类型: TEXT_ELEMENT 。
function createElement(type, props, ...children) {
  return {
    type,
    props: {
      ...props,
			children: children.map(child =>
        typeof child === "object"
          ? child
          : createTextElement(child)
      ),
    },
  }
}

function createTextElement(text) {
  return {
    type: "TEXT_ELEMENT",
    props: {
      nodeValue: text,
      children: [],
    },
  }
}
2
3
4
5
6
7
8
9
10
11
12
13
14
15
16
17
18
19
20
21
22
23
React在没有子元素时不会包装原始值或创建空数组,但我们这样做是因为它能简化我们的代码,且对于我们的库来说,我们更倾向于简洁的代码而不是性能优化。 我们仍在使用React的createElement。
const element = React.createElement(
  "div",
  { id: "foo" },
  React.createElement("a", null, "bar"),
  React.createElement("b")
)
const container = document.getElementById("root")
ReactDOM.render(element, container)
2
3
4
5
6
7
8
为了替换它,我们给我们的库取个名字;这个名字需要听起来像 React,同时又能暗示它的教学目的;我们将其称为 Didact.
const Didact = {
createElement,
}
const element = Didact.createElement(
"div",
{ id: "foo" },
Didact.createElement("a", null, "bar"),
Didact.createElement("b")
)
const container = document.getElementById("root")
ReactDOM.render(element, container)
2
3
4
5
6
7
8
9
10
11
12
但我们仍然希望在这里使用 JSX。我们如何告诉 babel 使用Didact的createElement而不是React的? 如果我们有这样的注释,当 babel转译JSX 时,它将使用我们定义的函数。
/** @jsx Didact.createElement */
const element = (
  <div id="foo">
    <a>bar</a>
    <b />
  </div>
)
2
3
4
5
6
7
# Step2:render Function
接下来,我们需要编写函数的ReactDOM.render版本;目前,我们只关心向DOM添加内容。我们稍后会处理更新和删除。 我们首先使用element类型创建 DOM 节点,然后将新节点附加到容器中。
function render(element, container) {
const dom = document.createElement(element.type)
container.appendChild(dom)
}
2
3
4
5
我们递归地为每个孩子做同样的事情。
function render(element, container) {
const dom = document.createElement(element.type)
+ element.props.children.forEach(child =>
+ render(child, dom)
+ )
container.appendChild(dom)
}
2
3
4
5
6
7
8
9
我们还需要处理文本元素,如果元素类型为TEXT_ELEMENT,我们创建一个文本节点而不是常规节点。
function render(element, container) {
+ const dom =
+ element.type == "TEXT_ELEMENT"
+ ? document.createTextNode("")
+ : document.createElement(element.type)
element.props.children.forEach(child =>
render(child, dom)
)
container.appendChild(dom)
}
2
3
4
5
6
7
8
9
10
11
12
我们在这里需要做的最后一件事是将 element props 分配给节点。
function render(element, container) {
const dom =
element.type == "TEXT_ELEMENT"
? document.createTextNode("")
: document.createElement(element.type)
+ const isProperty = key => key !== "children"
+ Object.keys(element.props)
+ .filter(isProperty)
+ .forEach(name => {
+ dom[name] = element.props[name]
+ })
element.props.children.forEach(child =>
render(child, dom)
)
container.appendChild(dom)
}
2
3
4
5
6
7
8
9
10
11
12
13
14
15
16
17
18
19
20
就是这样。我们现在有一个可以将 JSX渲染到DOM的库。
# Step3: Concurrent Mode (并行模式)
但。。。在我们开始添加更多代码之前,我们需要一个重构
这个递归调用有问题。
一旦我们开始渲染,我们不会停止,直到我们渲染了完整的元素树。如果元素树很大,则可能会阻塞主线程太久。如果浏览器需要执行高优先级作,例如处理用户输入或保持动画流畅,则必须等到渲染完成。
因此,我们将工作分解为小单元,完成每个单元后,如果有其他需要完成的事情,我们将让浏览器中断渲染。
我们用来requestIdleCallback制作一个循环。你可以把它看requestIdleCallback是一个setTimeout ,但浏览器会在主线程空闲时运行回调,而不是我们告诉它何时运行。
React不再使用 requestIdleCallback,现在,它使用scheduler package 。但对于这个用例,它在概念上是相同的。
requestIdleCallback还给了我们一个 deadline 参数。我们可以使用它来检查浏览器需要再次控制之前我们还有多少时间
截至 2019 年 11 月,Concurrent 模式在 React 中还不稳定。循环的稳定版本看起来更像这样:
while (nextUnitOfWork) {
  nextUnitOfWork = performUnitOfWork(
    nextUnitOfWork
  )
}
2
3
4
5
要开始使用循环,我们需要设置第一个工作单元,然后编写一个performUnitOfWork函数,该函数不仅执行工作,还返回下一个工作单元。
function workLoop(deadline) {
let shouldYield = false
while (nextUnitOfWork && !shouldYield) {
nextUnitOfWork = performUnitOfWork(
nextUnitOfWork
)
shouldYield = deadline.timeRemaining() < 1
}
requestIdleCallback(workLoop)
}
requestIdleCallback(workLoop)
function performUnitOfWork(nextUnitOfWork) {
// TODO
}
2
3
4
5
6
7
8
9
10
11
12
13
14
15
16
# Step4: Fibers
要组织工作单元,我们需要一个数据结构:fibers树。
我们将为每个element提供一个fiber,并且每个fiber将是一个工作单元。
让我给你看一个例子。
假设我们想要渲染一个像这样的个element树:
Didact.render(
  <div>
    <h1>
      <p />
      <a />
    </h1>
    <h2 />
  </div>,
  container
)
2
3
4
5
6
7
8
9
10
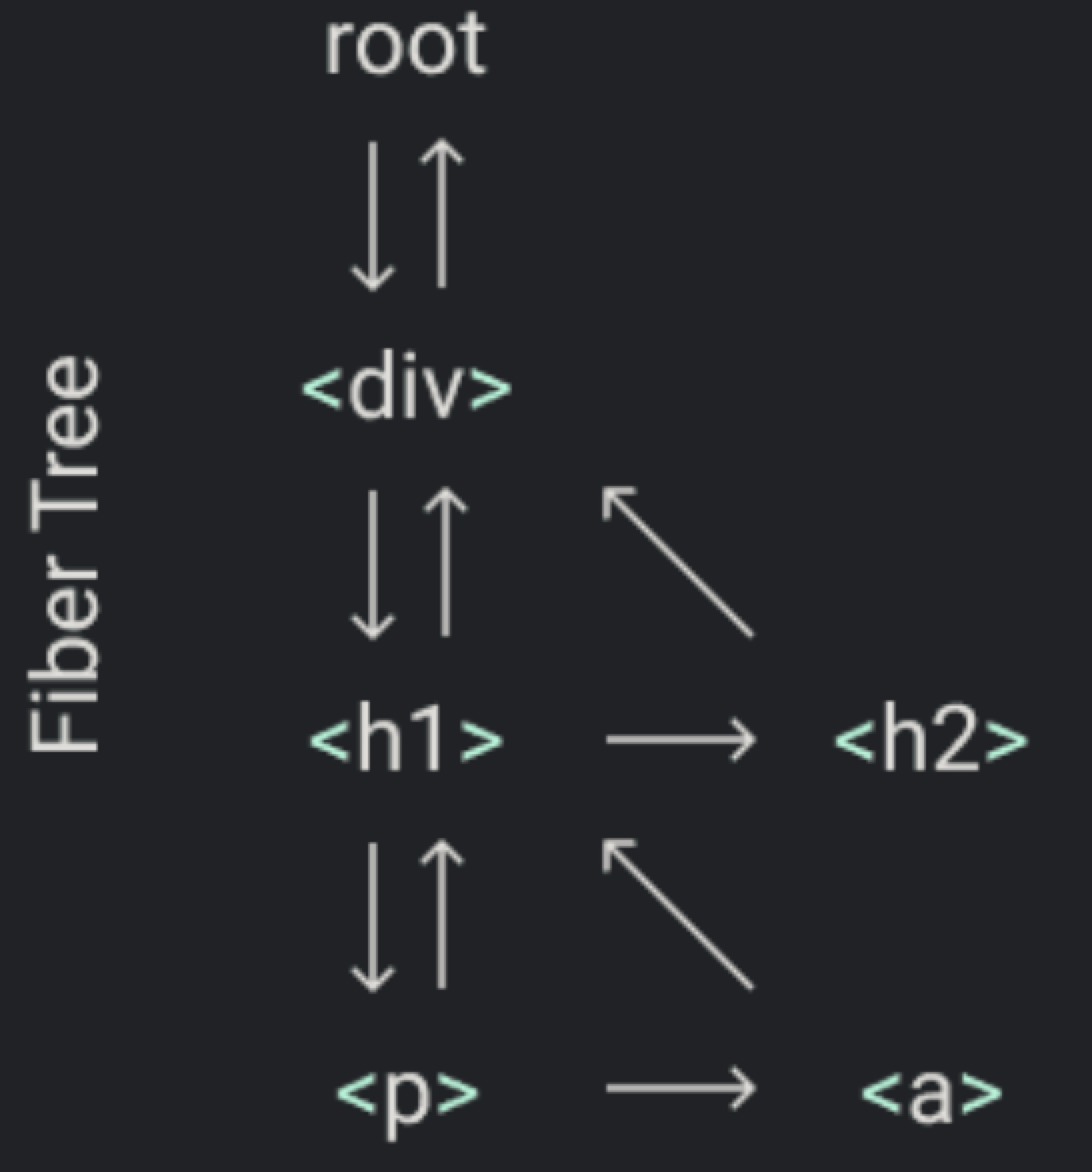
在渲染阶段,我们将创建根Fiber节点并将其设为 nextUnitOfWork。剩余的工作将在 performUnitOfWork 函数中完成,该函数会对每个 Fiber 节点执行以下三个步骤:
创建当前Fiber对应的 DOM 元素
为element’s的子元素创建fiber(Reconcile)
选择下一个工作单元(nextUnitOfWork)
这种数据结构的设计目标之一,是便于快速定位下一个待处理的工作单元(next unit of work)。为此,每个 Fiber 节点都包含指向其第一个子节点(first child)、相邻兄弟节点(next sibling)和父节点(parent)的链接。
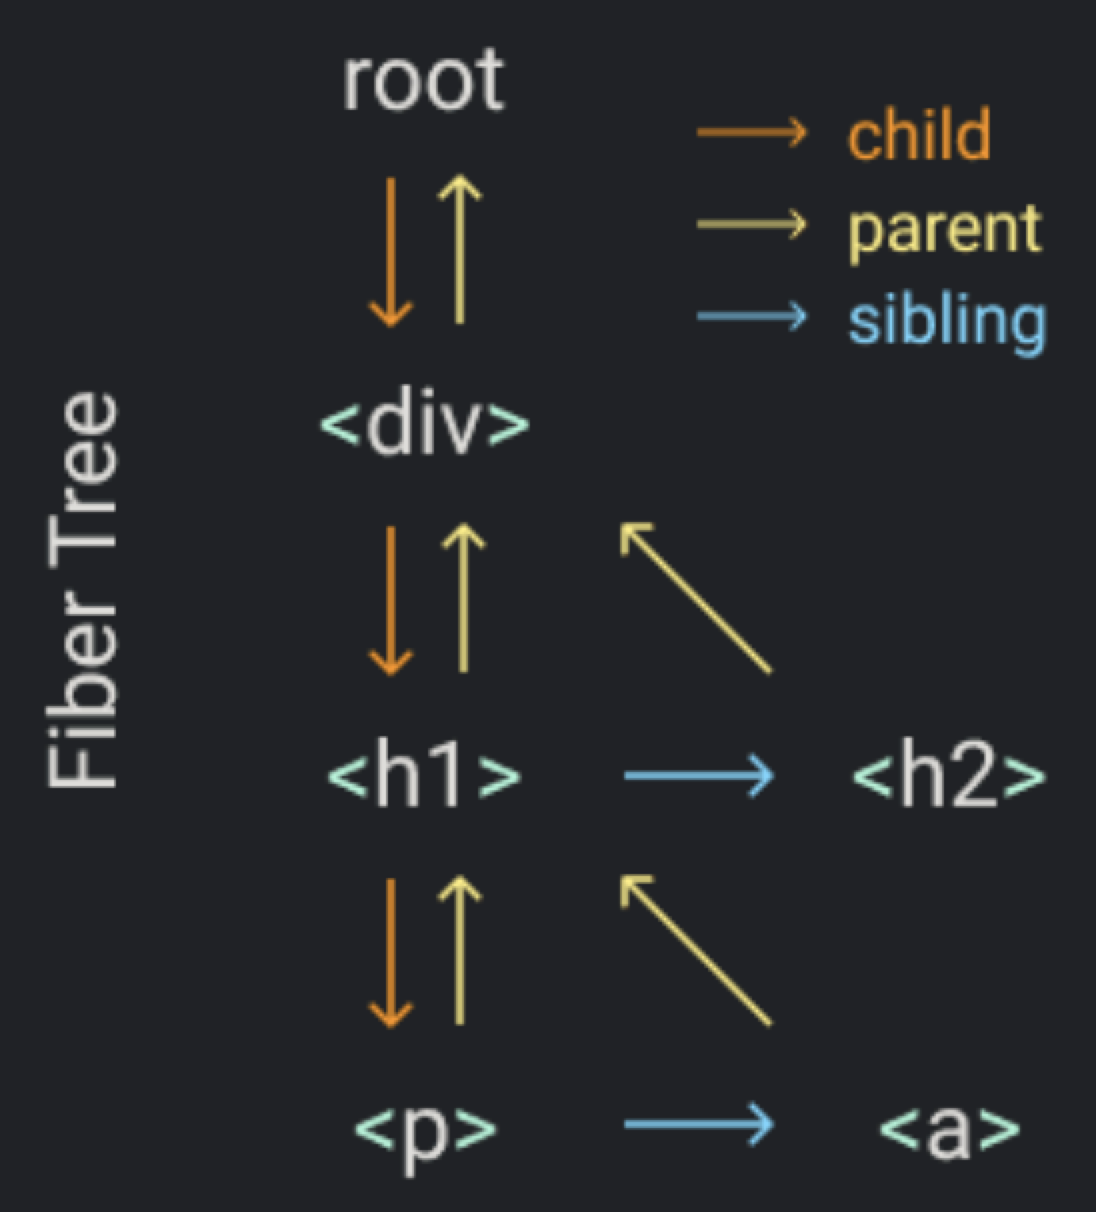
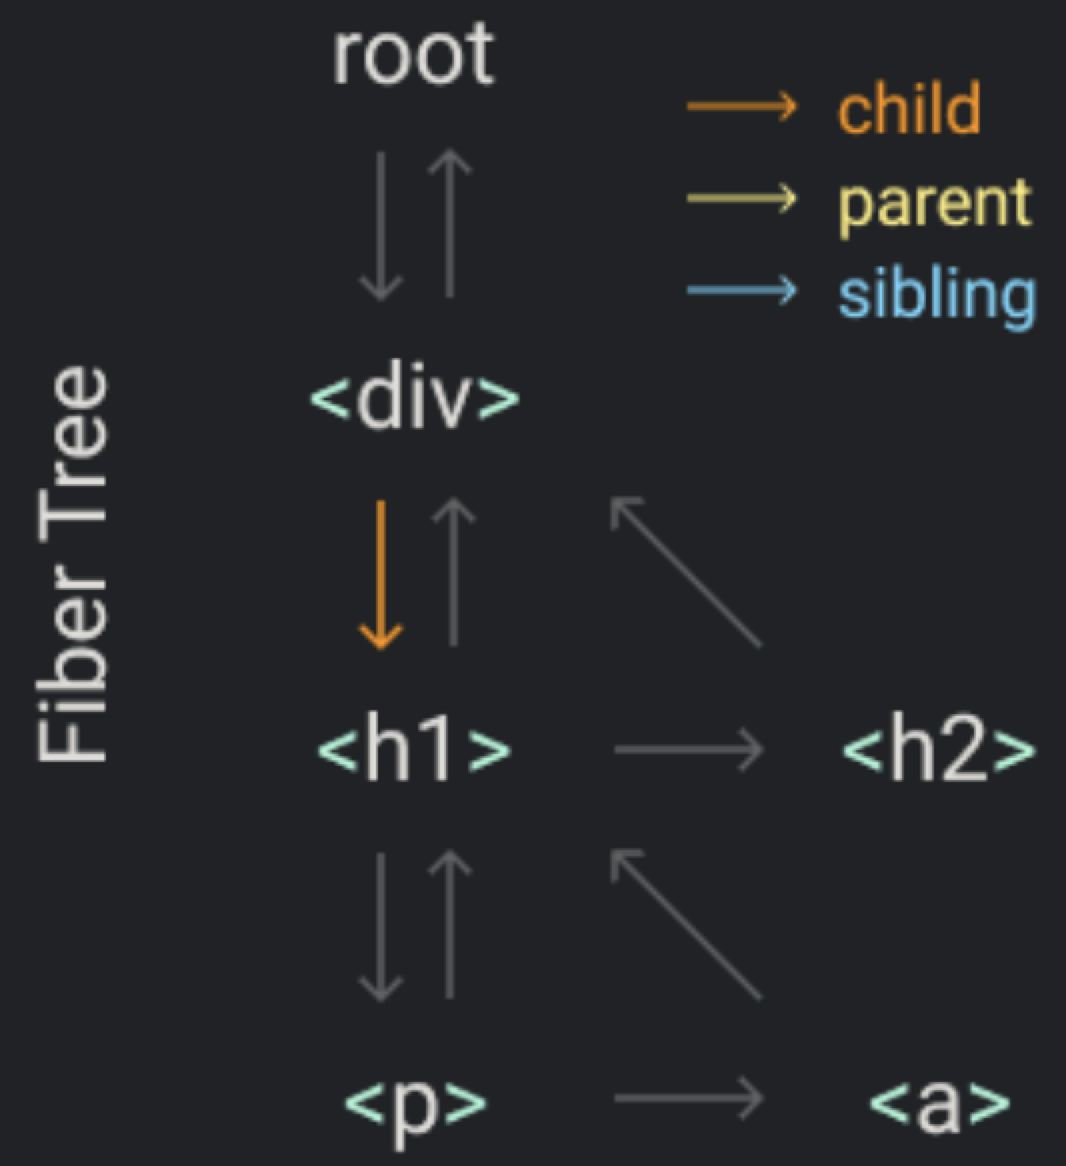
当我们完成对某个Fiber节点的处理后,如果它有子节点,那么该子节点将成为下一个工作单元(遵循深度优先遍历原则)。
从我们的示例中,当我们完成div对fiber的工作时,下一个工作单元将是h1光纤。
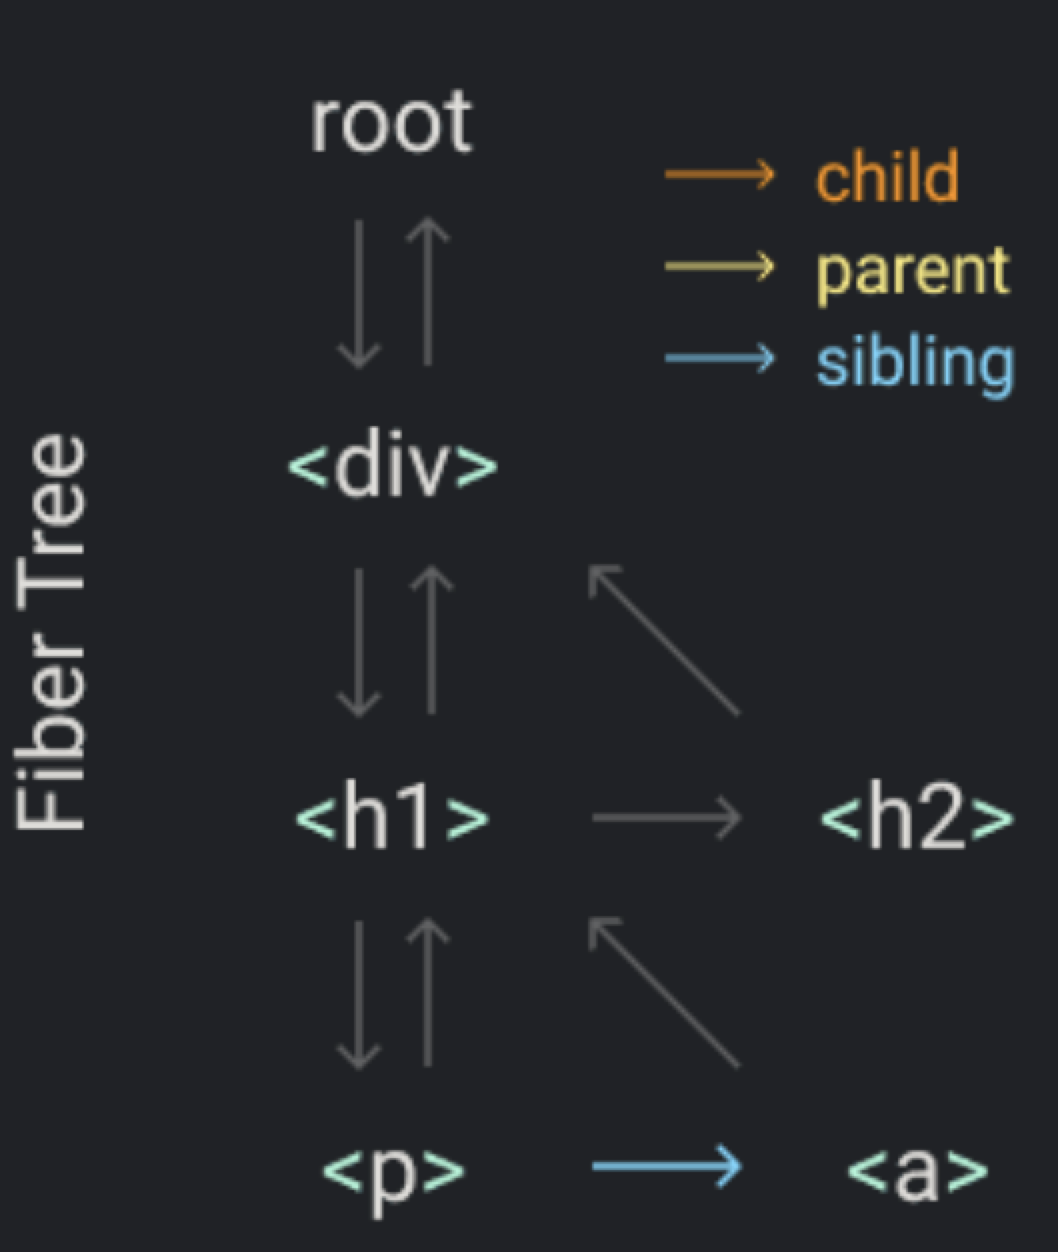
若当前 Fiber 节点没有子节点,则将其兄弟节点(sibling)设为下一个工作单元(遵循深度优先遍历规则)。
例如,当 p Fiber 节点没有子节点时,处理完p后,下一个工作单元将是其兄弟节点 a Fiber(假设 a 是 p 的相邻兄弟节点)。
如果某个Fiber节点既没有子节点也没有兄弟节点,则会回溯到其父节点的兄弟节点(即“叔叔节点”,如示例中的 a 和 h2 Fiber)。
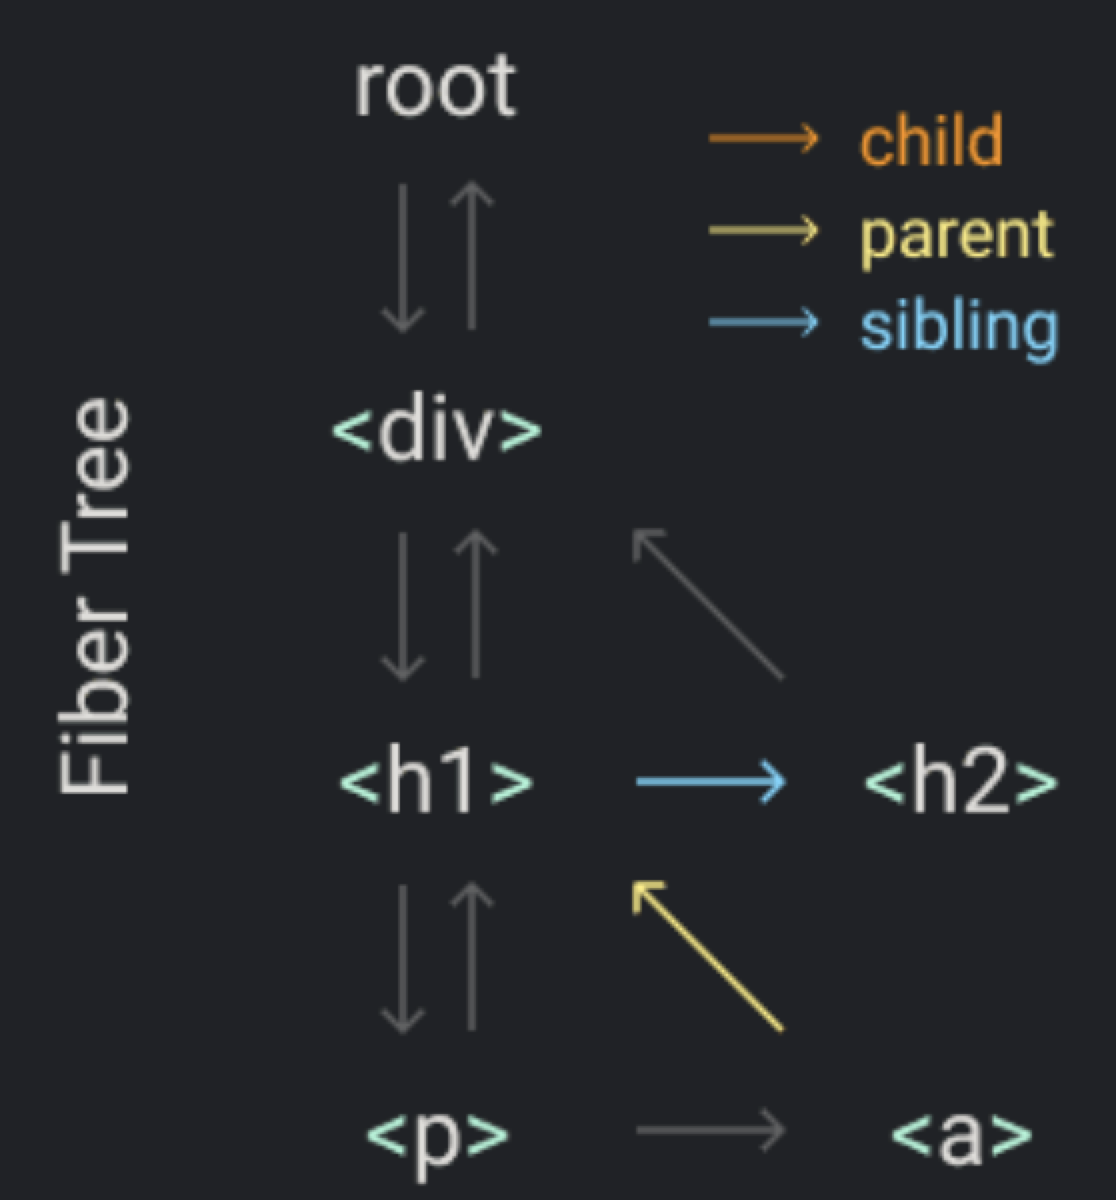
如果父节点也没有兄弟节点,我们将持续向上回溯父节点链,直到找到某个祖先节点存在兄弟节点,或者最终抵达根节点(root)。如果已回溯到根节点且无更多任务,则意味着本次渲染的所有工作均已完成。
现在让我们将其放入代码中。
首先,让我们从render函数中删除此代码。
我们将创建 DOM 节点的部分保留在它自己的函数中,我们稍后会使用它。
function createDom(fiber) {
const dom =
fiber.type == "TEXT_ELEMENT"
? document.createTextNode("")
: document.createElement(fiber.type)
const isProperty = key => key !== "children"
Object.keys(fiber.props)
.filter(isProperty)
.forEach(name => {
dom[name] = fiber.props[name]
})
return dom
}
2
3
4
5
6
7
8
9
10
11
12
13
14
15
在函数中render,我们设置为nextUnitOfWork纤程树的根。
function render(element, container) {
  nextUnitOfWork = {
    dom: container,
    props: {
      children: [element],
    },
  }
}
2
3
4
5
6
7
8
然后,当浏览器准备就绪时,它将调用我们的workLoop,我们将开始在根上工作。
当浏览器准备就绪时(例如主线程空闲),它将调用我们的workLoop,此时我们会从根Fiber(root)开始处理整个 Fiber 树的协调(Reconciliation)任务。
function performUnitOfWork(fiber) {
// 1.首先,我们创建一个新的DOM节点,并将其追加到父节点中(通常在React的提交阶段完成,而非协调阶段)。
// 我们将DOM节点关联并跟踪在fiber.dom 属性中,以便后续操作(如更新、插入或删除)能直接通过 Fiber 节点引用对应的真实 DOM。
if (!fiber.dom) {
fiber.dom = createDom(fiber)
}
if (fiber.parent) {
fiber.parent.dom.appendChild(fiber.dom)
}
// 随后,我们为每个子元素(child)创建一个新的 Fiber 节点,并将其链接到当前 Fiber 的子节点链表中。
const elements = fiber.props.children
let index = 0
let prevSibling = null
while (index < elements.length) {
const element = elements[index]
const newFiber = {
type: element.type,
props: element.props,
parent: fiber,
dom: null,
}
// 我们会将新创建的 Fiber节点加入Fiber树中,根据其是否为父节点的第一个子元素,将其设置为父节点的子节点(child)或前一个子节点的兄弟节点(sibling)。
if (index === 0) {
fiber.child = newFiber
} else {
prevSibling.sibling = newFiber
}
prevSibling = newFiber
index++
}
//最终,我们会按照以下顺序查找下一个工作单元(next unit of work):优先子节点(child),其次是兄弟节点(sibling),然后是父节点的兄弟节点(“叔叔节点”),依此类推向上回溯,直到找到下一个待处理的 Fiber 或抵达根节点。
if (fiber.child) {
return fiber.child
}
let nextFiber = fiber
while (nextFiber) {
if (nextFiber.sibling) {
return nextFiber.sibling
}
nextFiber = nextFiber.parent
}
}
2
3
4
5
6
7
8
9
10
11
12
13
14
15
16
17
18
19
20
21
22
23
24
25
26
27
28
29
30
31
32
33
34
35
36
37
38
39
40
41
42
43
44
45
46
47
48
49
50
51
这就是我们的 performUnitOfWork .
# Step5: Render 和 Commit 阶段
我们这里有另一个问题。
我们在处理每个element时,都会向DOM添加一个新节点。请记住,浏览器可能会在我们完成整个树的渲染之前中断我们的工作。这种情况下,用户将看到不完整的UI界面。而这正是我们需要避免的情况。
所以我们需要从这里删除改变 DOM 的部分。
function performUnitOfWork(fiber) {
if (!fiber.dom) {
fiber.dom = createDom(fiber)
}
- if (fiber.parent) {
- fiber.parent.dom.appendChild(fiber.dom)
- }
...
}
2
3
4
5
6
7
8
9
10
相反,我们将追踪Fiber树的根节点。我们将其称为"进行中根节点"(work in progress root)或简写为wipRoot
function render(element, container) {
+ wipRoot = {
dom: container,
props: {
children: [element],
},
}
+ nextUnitOfWork = wipRoot
}
let nextUnitOfWork = null
let wipRoot = null
2
3
4
5
6
7
8
9
10
11
12
当我们完成所有工作时(通过没有下一个工作单元来判断),就会将整个Fiber树提交到DOM。
function workLoop(deadline) {
let shouldYield = false
while (nextUnitOfWork && !shouldYield) {
nextUnitOfWork = performUnitOfWork(
nextUnitOfWork
)
shouldYield = deadline.timeRemaining() < 1
}
+ if (!nextUnitOfWork && wipRoot) {
+ commitRoot()
+ }
requestIdleCallback(workLoop)
}
requestIdleCallback(workLoop)
2
3
4
5
6
7
8
9
10
11
12
13
14
15
16
17
我们通过commitRoot函数实现这一过程。在该函数中,我们会递归地将所有节点附加到DOM树。
function commitRoot() {
commitWork(wipRoot.child)
wipRoot = null
}
function commitWork(fiber) {
if (!fiber) {
return
}
const domParent = fiber.parent.dom
domParent.appendChild(fiber.dom)
commitWork(fiber.child)
commitWork(fiber.sibling)
}
2
3
4
5
6
7
8
9
10
11
12
13
14
# Step6: Reconciliation (协调算法)
到目前为止,我们只向 DOM 添加了一些内容,但是更新或删除节点呢?
这就是我们接下来要做的:需要将渲染函数接收到的元素与我们上一次提交到 DOM 中的 fiber 树进行对比。
我们还会为每个 fiber 添加一个 alternate 属性。该属性指向旧fiber,即在上一次提交阶段(commit phase)中我们已提交到 DOM 的 fiber。
function commitRoot() {
commitWork(wipRoot.child)
+ currentRoot = wipRoot
wipRoot = null
}
function commitWork(fiber) {
if (!fiber) {
return
}
const domParent = fiber.parent.dom
domParent.appendChild(fiber.dom)
commitWork(fiber.child)
commitWork(fiber.sibling)
}
function render(element, container) {
wipRoot = {
dom: container,
props: {
children: [element],
},
+ alternate: currentRoot,
}
nextUnitOfWork = wipRoot
}
let nextUnitOfWork = null
+let currentRoot = null
let wipRoot = null
2
3
4
5
6
7
8
9
10
11
12
13
14
15
16
17
18
19
20
21
22
23
24
25
26
27
28
29
30
31
现在,让我们从 performUnitOfWork 函数中抽取出负责创建新 fiber 的代码部分…
function performUnitOfWork(fiber) {
if (!fiber.dom) {
fiber.dom = createDom(fiber)
}
const elements = fiber.props.children
reconcileChildren(fiber, elements)
if (fiber.child) {
return fiber.child
}
let nextFiber = fiber
while (nextFiber) {
if (nextFiber.sibling) {
return nextFiber.sibling
}
nextFiber = nextFiber.parent
}
}
2
3
4
5
6
7
8
9
10
11
12
13
14
15
16
17
18
19
……并将其放入新的 reconcileChildren 函数中。
function reconcileChildren(wipFiber, elements) {
let index = 0
let prevSibling = null
while (index < elements.length) {
const element = elements[index]
const newFiber = {
type: element.type,
props: element.props,
parent: wipFiber,
dom: null,
}
if (index === 0) {
wipFiber.child = newFiber
} else {
prevSibling.sibling = newFiber
}
prevSibling = newFiber
index++
}
}
2
3
4
5
6
7
8
9
10
11
12
13
14
15
16
17
18
19
20
21
22
23
24
在此处,我们将旧的fiber与新的元素进行协调。
我们会同时遍历旧fiber的子节点(即 wipFiber.alternate)与需要协调的新元素数组。
如果我们忽略同时遍历数组和链表所需的样板代码,那么循环中最关键的部分就是 oldFiber 和 element。element 是当前需要渲染到 DOM 的内容,而 oldFiber 是上一次渲染的结果。
function reconcileChildren(wipFiber, elements) {
  let index = 0
  let oldFiber =
    wipFiber.alternate && wipFiber.alternate.child
  let prevSibling = null

  while (
    index < elements.length ||
    oldFiber != null
  ) {
    const element = elements[index]
    let newFiber = null

    // TODO compare oldFiber to element
  }
}
2
3
4
5
6
7
8
9
10
11
12
13
14
15
16
17
我们需要对它们进行比较,以判断是否存在需要应用到 DOM 上的变更。
在比较时,我们会依据类型(type)来进行判断:
- 如果旧fiber和新element的类型相同,我们可以保留DOM节点,仅使用新的属性(props)更新它。
- 如果类型不同且存在新元素时,意味着我们需要创建一个新的 DOM 节点。
- 如果类型不同且存在旧 fiber,则需要移除旧节点。
const sameType =
oldFiber &&
element &&
element.type == oldFiber.type
if (sameType) {
// TODO update the node
}
if (element && !sameType) {
// TODO add this node
}
if (oldFiber && !sameType) {
// TODO delete the oldFiber's node
}
2
3
4
5
6
7
8
9
10
11
12
13
14
React 在此过程中还使用了 key 属性,这使得协调过程更加高效。例如,当元素数组中的子元素位置发生变化时,key 能够帮助 React识别这种位置变动并进行优化处理。
当旧 fiber和 element具有相同的类型时,我们创建一个新的 fiber,将 DOM 节点与旧 fiber 保持在一起,并从 props 从element中保留 props。
我们还会给这个 fiber 添加一个新的属性:effectTag。后续在提交阶段(commit phase)时,我们将通过这个属性来识别需要执行的具体 DOM 操作(例如更新属性、新增或删除节点等)
const sameType =
oldFiber &&
element &&
element.type == oldFiber.type
if (sameType) {
newFiber = {
type: oldFiber.type,
props: element.props,
dom: oldFiber.dom,
parent: wipFiber,
alternate: oldFiber,
effectTag: "UPDATE",
}
}
2
3
4
5
6
7
8
9
10
11
12
13
14
15
16
17
对于需要创建新DOM节点的情况,我们会给新生成的fiber 打上 PLACEMENT的effect 标签。这表示在后续提交阶段(commit phase),该fiber对应的 DOM 节点需要被插入到父容器中。
  if (element && !sameType) {
      newFiber = {
        type: element.type,
        props: element.props,
        dom: null,
        parent: wipFiber,
        alternate: null,
        effectTag: "PLACEMENT",
      }
    }
2
3
4
5
6
7
8
9
10
对于需要删除节点的情况(即旧fiber存在但新元素不存在),由于没有新fiber生成,我们会在旧fiber上添加 DELETION的effect 标签。这表示在提交阶段(commit phase)需要移除该fiber对应的 DOM 节点。例如:
   if (oldFiber && !sameType) {
      oldFiber.effectTag = "DELETION"
      deletions.push(oldFiber)
    }
2
3
4
但在将 fiber 树提交到 DOM 时,我们是从当前正在处理的根节点(work in progress root)开始操作的,而这个新生成的 fiber 树中并不包含旧的 fiber 节点。因此,我们需要在协调阶段(reconciliation)提前记录所有需要删除的旧 fiber 节点,并在提交阶段统一处理它们。
function render(element, container) {
wipRoot = {
dom: container,
props: {
children: [element],
},
alternate: currentRoot,
}
+ deletions = []
nextUnitOfWork = wipRoot
}
let nextUnitOfWork = null
let currentRoot = null
let wipRoot = null
+let deletions = null
2
3
4
5
6
7
8
9
10
11
12
13
14
15
16
17
18
19
在提交阶段处理 DOM 变更时,我们会专门遍历这个收集了待删除旧 fiber 的数组(deletions),直接通过它们执行 DOM 节点的移除操作。这样设计的关键原因在于:新生成的 work-in-progress 树中并不包含这些需要删除的旧 fiber,因此必须通过独立的数组来跟踪并处理这些删除操作。
function commitRoot() {
+ deletions.forEach(commitWork)
  commitWork(wipRoot.child)
  currentRoot = wipRoot
  wipRoot = null
}
2
3
4
5
6
7
现在,我们需要修改 commitWork 函数,使其能够根据 fiber 的 effectTag 处理不同的 DOM 操作(如新增、更新、删除)
如果fiber的 effect 标签为 PLACEMENT,我们会执行与之前相同的操作:将 fiber 对应的 DOM 节点附加到父 fiber 的 DOM 节点下
function commitWork(fiber) {
 if (
    fiber.effectTag === "PLACEMENT" &&
    fiber.dom != null
  ) {
    domParent.appendChild(fiber.dom)
  }
}
2
3
4
5
6
7
8
如果 fiber 的 effect 标签为 DELETION,我们会执行相反的操作:从父 DOM 节点中移除对应的子节点。
function commitWork(fiber) {
 if (
    fiber.effectTag === "PLACEMENT" &&
    fiber.dom != null
  ) {
    domParent.appendChild(fiber.dom)
+  } else if (fiber.effectTag === "DELETION") {
+    domParent.removeChild(fiber.dom)
+  }
}
2
3
4
5
6
7
8
9
10
如果fiber的 effect 标签为 UPDATE,我们需要对比新旧属性(props)的差异,并将变更的部分应用到现有的 DOM 节点上
function commitWork(fiber) {
 if (
    fiber.effectTag === "PLACEMENT" &&
    fiber.dom != null
  ) {
    domParent.appendChild(fiber.dom)
 }
+ }else if( fiber.effectTag === "UPDATE" && fiber.dom != null){
+   updateDom(
+     fiber.dom,
+      fiber.alternate.props,
+     fiber.props
+    )
 }else if (fiber.effectTag === "DELETION") {
   domParent.removeChild(fiber.dom)
}
2
3
4
5
6
7
8
9
10
11
12
13
14
15
16
我们将在这个updateDom函数中执行。
我们会对比旧 fiber 与新 fiber 的属性(props),移除已不存在的属性,并设置新增或发生变更的属性。具体步骤如下:
const isProperty = key => key !== "children"
const isNew = (prev, next) => key =>prev[key] !== next[key]
const isGone = (prev, next) => key => !(key in next)
function updateDom(dom, prevProps, nextProps) {
// Remove old properties
Object.keys(prevProps)
.filter(isProperty)
.filter(isGone(prevProps, nextProps))
.forEach(name => {
dom[name] = ""
})
// Set new or changed properties
Object.keys(nextProps)
.filter(isProperty)
.filter(isNew(prevProps, nextProps))
.forEach(name => {
dom[name] = nextProps[name]
})
}
2
3
4
5
6
7
8
9
10
11
12
13
14
15
16
17
18
19
20
对于以 on 开头的属性(如 onClick、onChange 等事件监听器),我们需要特殊处理它们的更新逻辑。这是因为事件监听器的本质是函数引用,直接更新属性值无法自动解绑旧监听器,必须显式移除旧函数并绑定新函数。
const isEvent = key => key.startsWith("on")
const isProperty = key =>key !== "children" && !isEvent(key)
2
如果事件处理函数(event handler)发生了变化,我们会将其从对应的 DOM 节点上移除。这是为了确保旧的事件监听器不再被触发,避免内存泄漏或意外行为。
 //Remove old or changed event listeners
  Object.keys(prevProps)
    .filter(isEvent)
    .filter(
      key =>
        !(key in nextProps) ||
        isNew(prevProps, nextProps)(key)
    )
    .forEach(name => {
      const eventType = name
        .toLowerCase()
        .substring(2)
      dom.removeEventListener(
        eventType,
        prevProps[name]
      )
    })
2
3
4
5
6
7
8
9
10
11
12
13
14
15
16
17
然后我们添加新的处理程序。
// Add event listeners
  Object.keys(nextProps)
    .filter(isEvent)
    .filter(isNew(prevProps, nextProps))
    .forEach(name => {
      const eventType = name
        .toLowerCase()
        .substring(2)
      dom.addEventListener(
        eventType,
        nextProps[name]
      )
    })
2
3
4
5
6
7
8
9
10
11
12
13
# Step7: Function Components 函数组件
接下来我们需要添加的是 function components
首先,让我们改变一下例子。我们将使用这个简单的函数组件,它返回一个h1元素。
const Didact = {
createElement,
render,
}
/** @jsx Didact.createElement */
function App(props) {
return <h1>Hi {props.name}</h1>
}
const element = <App name="foo" />
const container = document.getElementById("root")
Didact.render(element, container)
2
3
4
5
6
7
8
9
10
11
12
请注意,如果我们将 jsx 转换为 js,它将是:
function App(props) {
  return Didact.createElement(
    "h1",
    null,
    "Hi ",
    props.name
  )
}
const element = Didact.createElement(App, {
  name: "foo",
})
2
3
4
5
6
7
8
9
10
11
函数组件在两个方面有所不同:
- 来自函数组件的 fiber 没有 DOM 节点
- 在函数组件中,子元素(children)是通过执行组件函数生成的,而不是直接从某个属性(如 props.children
在 React 的Fiber架构中,我们会检查 Fiber 节点的类型type是否为函数,并根据这一判断调用不同的更新函数。
function performUnitOfWork(fiber) {
+ const isFunctionComponent =
+ fiber.type instanceof Function
+ if (isFunctionComponent) {
+ updateFunctionComponent(fiber)
+ } else {
+ updateHostComponent(fiber)
+ }
if (fiber.child) {
return fiber.child
}
let nextFiber = fiber
while (nextFiber) {
if (nextFiber.sibling) {
return nextFiber.sibling
}
nextFiber = nextFiber.parent
}
}
+function updateFunctionComponent(fiber) {
// TODO
}
+ function updateHostComponent(fiber) {
if (!fiber.dom) {
fiber.dom = createDom(fiber)
}
reconcileChildren(fiber, fiber.props.children)
}
2
3
4
5
6
7
8
9
10
11
12
13
14
15
16
17
18
19
20
21
22
23
24
25
26
27
28
29
30
在 updateHostComponent 函数中,我们保持原有逻辑不变(即与之前处理宿主组件的方式一致)。
在 updateFunctionComponent 函数中,我们执行函数组件以获取其返回的子元素。
在我们的示例中,fiber.type 对应的是 App 函数组件,当我们执行该组件时(即调用 App()),它会返回一个 h1 元素
function updateFunctionComponent(fiber) {
  const children = [fiber.type(fiber.props)]
  reconcileChildren(fiber, children)
}
2
3
4
在获取子元素后,协调(Reconciliation)机制的工作方式完全一致,我们无需对此做任何修改。
我们需要改变的是commitWork功能。
现在我们有了没有DOM 节点的fiber,我们需要改变两件事。
首先,为了找到 DOM 节点的父级,我们需要沿着 Fiber 树向上遍历,直到找到一个含有 DOM 节点的 Fiber 节点。
function commitWork(fiber) {
if (!fiber) {
return
}
+ let domParentFiber = fiber.parent
+ while (!domParentFiber.dom) {
+ domParentFiber = domParentFiber.parent
+ }
+ const domParent = domParentFiber.dom
if (
fiber.effectTag === "PLACEMENT" &&
fiber.dom != null
) {
+ domParent.appendChild(fiber.dom)
} else if (
fiber.effectTag === "UPDATE" &&
fiber.dom != null
) {
updateDom(
fiber.dom,
fiber.alternate.props,
fiber.props
)
}
}
2
3
4
5
6
7
8
9
10
11
12
13
14
15
16
17
18
19
20
21
22
23
24
25
26
27
当删除一个节点时,我们还需要继续前进,直到找到一个具有 DOM 节点的子节点。
function commitWork(fiber) {
if (!fiber) {
return
}
let domParentFiber = fiber.parent
while (!domParentFiber.dom) {
domParentFiber = domParentFiber.parent
}
const domParent = domParentFiber.dom
if (
fiber.effectTag === "PLACEMENT" &&
fiber.dom != null
) {
domParent.appendChild(fiber.dom)
} else if (
fiber.effectTag === "UPDATE" &&
fiber.dom != null
) {
updateDom(
fiber.dom,
fiber.alternate.props,
fiber.props
)
}else if (fiber.effectTag === "DELETION") {
commitDeletion(fiber, domParent)
}
}
function commitDeletion(fiber, domParent) {
if (fiber.dom) {
domParent.removeChild(fiber.dom)
} else {
commitDeletion(fiber.child, domParent)
}
}
2
3
4
5
6
7
8
9
10
11
12
13
14
15
16
17
18
19
20
21
22
23
24
25
26
27
28
29
30
31
32
33
34
35
36
37
# Step8: Hooks
现在,我们将在函数组件中引入 状态(state)
让我们将示例修改为经典的计数器组件。每次点击按钮时,状态值会增加 1
const Didact = {
  createElement,
  render,
  useState,
}
2
3
4
5
/** @jsx Didact.createElement */
function Counter() {
  const [state, setState] = Didact.useState(1)
  return (
    <h1 onClick={() => setState(c => c + 1)}>
      Count: {state}
    </h1>
  )
}
const element = <Counter />
const container = document.getElementById("root")
Didact.render(element, container)
2
3
4
5
6
7
8
9
10
11
12
我们通过 Didact.useState 来管理计数器的状态值
这是我们从示例中调用Counter函数的地方。在该函数中,我们调用 useState .
function updateFunctionComponent(fiber) {
const children = [fiber.type(fiber.props)]
reconcileChildren(fiber, children)
}
function useState(initial) {
// TODO
}
2
3
4
5
6
7
8
9
我们需要在调用函数组件之前初始化一些全局变量,以便我们可以在useState函数内部使用它们。
首先,我们将当前正在处理的Fiber节点(即 work in progress fiber)设置为初始状态。
我们还会为每个fiber节点添加一个 hooks 数组,以支持在同一个组件中多次调用 useState等Hook函数。同时,我们会通过 hookIndex(当前 Hook 索引) 跟踪Hook的调用顺序,确保状态与Hook的对应关系在多次渲染中保持一致。
let wipFiber = null
let hookIndex = null

function updateFunctionComponent(fiber) {
+  wipFiber = fiber
+  hookIndex = 0
+  wipFiber.hooks = []
+  const children = [fiber.type(fiber.props)]
  reconcileChildren(fiber, children)
}
2
3
4
5
6
7
8
9
10
当函数组件调用useState 时,我们会检查是否存在旧的Hook状态。具体来说,我们通过当前 Fiber 节点的 alternate 属性(指向旧 Fiber)和 Hook 索引(hook index) 来定位对应的旧 Hook。
当函数组件调用 useState 时,React会根据是否存在旧的Hook决定如何初始化状态
function useState(initial) {
const oldHook =
wipFiber.alternate &&
wipFiber.alternate.hooks &&
wipFiber.alternate.hooks[hookIndex]
const hook = {
state: oldHook ? oldHook.state : initial,
}
wipFiber.hooks.push(hook)
hookIndex++
return [hook.state]
}
2
3
4
5
6
7
8
9
10
11
12
13
然后将新Hook添加到Fiber、递增索引并返回状态
useState也应该返回一个函数来更新state,所以我们定义了一个setState接收 action 的函数(例如,Counter这个 action 是将 state 增加 1 的函数)。
我们会将该操作(action)推入我们为 Hook 添加的队列中。
function useState(initial) {
const oldHook =
wipFiber.alternate &&
wipFiber.alternate.hooks &&
wipFiber.alternate.hooks[hookIndex]
const hook = {
state: oldHook ? oldHook.state : initial,
+ queue: [],
}
+ const setState = action => {
+ hook.queue.push(action)
+ wipRoot = {
+ dom: currentRoot.dom,
+ props: currentRoot.props,
+ alternate: currentRoot,
+ }
+ nextUnitOfWork = wipRoot
+ deletions = []
+ }
wipFiber.hooks.push(hook)
hookIndex++
+ return [hook.state, setState]
}
2
3
4
5
6
7
8
9
10
11
12
13
14
15
16
17
18
19
20
21
22
23
24
25
26
然后我们做一些类似于我们在render函数中所做的事情,将一个新的 work in progress 根设置为下一个工作单元,以便 work loop 可以开始新的渲染阶段。
但我们还没有采取行动。
function useState(initial) {
+  const actions = oldHook ? oldHook.queue : []
+  actions.forEach(action => {
+    hook.state = action(hook.state)
+  })
}
2
3
4
5
6
在下一次渲染组件时,我们会从旧 Hook 的队列中获取所有更新动作(actions),并逐个应用到新 Hook 的状态上,从而在返回状态时,它已是更新后的值。
就这样。我们已经构建了自己的 React 版本。
# 结语
除了帮助你理解 React 的工作原理外,这篇文章的目标之一是让你更容易更深入地了解 React 代码库。这就是为什么我们几乎在所有地方都使用相同的变量和函数名称。
例如,如果你在真实 React 应用程序的一个函数组件中添加了一个断点,调用堆栈应该向你显示:
- workLoop
- performUnitOfWork
- updateFunctionComponent
我们没有包含很多 React 功能和优化。例如,以下是 React 的不同之处
在 Didact 中,我们会在渲染阶段遍历整个 Fiber 树;而 React 则会根据一些启发式规则(如组件是否标记为未更新)跳过未发生变化的子树。
我们还在commit阶段遍历整个 tree。React 保留一个链表,其中仅包含具有 effect 的 fibers,并且只访问这些 fiber。
每次我们构建一个新的 work in progress 树时,我们都会为每个fiber创建新的对象。React 回收了之前树的fiber。
当 Didact 在渲染阶段收到新的更新时,它会丢弃正在进行的工作树并从根重新开始。React 使用过期时间戳标记每个更新,并使用它来决定哪个更新具有更高的优先级。
# 完整代码
// JSX转换函数
function createElement(type, props, ...children) {
return {
type,
props: {
...props,
children: children.map(child =>
typeof child === "object" ? child : createTextElement(child)
)
}
};
}
function createTextElement(text) {
return {
type: "TEXT_ELEMENT",
props: {
nodeValue: text,
children: []
}
};
}
// 渲染核心变量
let nextUnitOfWork = null;
let wipRoot = null;
let currentRoot = null;
let deletions = null;
let wipFiber = null; // 当前处理的fiber节点
let hookIndex = null; // hooks索引
// 主渲染函数
function render(element, container) {
wipRoot = {
dom: container,
props: {
children: [element]
},
alternate: currentRoot
};
deletions = [];
nextUnitOfWork = wipRoot;
}
// 工作循环
function workLoop(deadline) {
let shouldYield = false;
while (nextUnitOfWork && !shouldYield) {
nextUnitOfWork = performUnitOfWork(nextUnitOfWork);
shouldYield = deadline.timeRemaining() < 1;
}
if (!nextUnitOfWork && wipRoot) {
commitRoot();
}
requestIdleCallback(workLoop);
}
requestIdleCallback(workLoop);
// 执行工作单元
function performUnitOfWork(fiber) {
const isFunctionComponent = fiber.type instanceof Function;
if (isFunctionComponent) {
// 处理函数组件
wipFiber = fiber;
hookIndex = 0;
wipFiber.hooks = [];
const children = [fiber.type(fiber.props)];
reconcileChildren(fiber, children);
} else {
// 处理原生DOM组件
if (!fiber.dom) {
fiber.dom = createDom(fiber);
}
reconcileChildren(fiber, fiber.props.children);
}
if (fiber.child) {
return fiber.child;
}
let nextFiber = fiber;
while (nextFiber) {
if (nextFiber.sibling) {
return nextFiber.sibling;
}
nextFiber = nextFiber.parent;
}
}
// 创建DOM节点
function createDom(fiber) {
const dom =
fiber.type === "TEXT_ELEMENT"
? document.createTextNode("")
: document.createElement(fiber.type);
updateDom(dom, {}, fiber.props);
return dom;
}
// 属性更新逻辑
const isEvent = key => key.startsWith("on");
const isProperty = key => key !== "children" && !isEvent(key);
const isNew = (prev, next) => key => prev[key] !== next[key];
const isGone = (prev, next) => key => !(key in next);
function updateDom(dom, prevProps, nextProps) {
// 事件处理
Object.keys(prevProps)
.filter(isEvent)
.filter(key => !(key in nextProps) || isNew(prevProps, nextProps)(key))
.forEach(name => {
const eventType = name.toLowerCase().substring(2);
dom.removeEventListener(eventType, prevProps[name]);
});
// 属性更新
Object.keys(prevProps)
.filter(isProperty)
.filter(isGone(prevProps, nextProps))
.forEach(name => {
dom[name] = "";
});
Object.keys(nextProps)
.filter(isProperty)
.filter(isNew(prevProps, nextProps))
.forEach(name => {
dom[name] = nextProps[name];
});
// 新事件绑定
Object.keys(nextProps)
.filter(isEvent)
.filter(isNew(prevProps, nextProps))
.forEach(name => {
const eventType = name.toLowerCase().substring(2);
dom.addEventListener(eventType, nextProps[name]);
});
}
// 协调子节点
function reconcileChildren(wipFiber, elements) {
let index = 0;
let oldFiber = wipFiber.alternate?.child;
let prevSibling = null;
while (index < elements.length || oldFiber) {
const element = elements[index];
let newFiber = null;
const sameType = oldFiber && element && element.type === oldFiber.type;
if (sameType) {
// 更新节点
newFiber = {
type: oldFiber.type,
props: element.props,
dom: oldFiber.dom,
parent: wipFiber,
alternate: oldFiber,
effectTag: "UPDATE"
};
}
if (element && !sameType) {
// 新增节点
newFiber = {
type: element.type,
props: element.props,
dom: null,
parent: wipFiber,
alternate: null,
effectTag: "PLACEMENT"
};
}
if (oldFiber && !sameType) {
// 删除节点
oldFiber.effectTag = "DELETION";
deletions.push(oldFiber);
}
if (oldFiber) {
oldFiber = oldFiber.sibling;
}
if (index === 0) {
wipFiber.child = newFiber;
} else if (element) {
prevSibling.sibling = newFiber;
}
prevSibling = newFiber;
index++;
}
}
// 提交阶段
function commitRoot() {
deletions.forEach(commitWork);
commitWork(wipRoot.child);
currentRoot = wipRoot;
wipRoot = null;
}
function commitWork(fiber) {
if (!fiber) return;
let domParentFiber = fiber.parent;
while (!domParentFiber.dom) {
domParentFiber = domParentFiber.parent;
}
const domParent = domParentFiber.dom;
if (fiber.effectTag === "PLACEMENT" && fiber.dom != null) {
domParent.appendChild(fiber.dom);
} else if (fiber.effectTag === "UPDATE" && fiber.dom != null) {
updateDom(fiber.dom, fiber.alternate.props, fiber.props);
} else if (fiber.effectTag === "DELETION") {
commitDeletion(fiber, domParent);
}
commitWork(fiber.child);
commitWork(fiber.sibling);
}
function commitDeletion(fiber, domParent) {
if (fiber.dom) {
domParent.removeChild(fiber.dom);
} else {
commitDeletion(fiber.child, domParent);
}
}
// Hooks实现
function useState(initial) {
const oldHook =
wipFiber.alternate?.hooks &&
wipFiber.alternate.hooks[hookIndex];
const hook = {
state: oldHook ? oldHook.state : initial,
queue: []
};
// 执行队列中的action
const actions = oldHook ? oldHook.queue : [];
actions.forEach(action => {
hook.state = typeof action === 'function'
? action(hook.state)
: action;
});
const setState = action => {
hook.queue.push(action);
// 触发重新渲染
wipRoot = {
dom: currentRoot.dom,
props: currentRoot.props,
alternate: currentRoot
};
nextUnitOfWork = wipRoot;
deletions = [];
};
wipFiber.hooks.push(hook);
hookIndex++;
return [hook.state, setState];
}
// 导出库
const Didact = {
createElement,
render,
useState
};
/** 使用示例 **/
// @jsx Didact.createElement
function Counter() {
const [state, setState] = Didact.useState(1);
return (
<div>
<h1>Count: {state}</h1>
<button onClick={() => setState(c => c + 1)}>+</button>
</div>
);
}
const App = <Counter />;
const container = document.getElementById("root");
Didact.render(App, container);
2
3
4
5
6
7
8
9
10
11
12
13
14
15
16
17
18
19
20
21
22
23
24
25
26
27
28
29
30
31
32
33
34
35
36
37
38
39
40
41
42
43
44
45
46
47
48
49
50
51
52
53
54
55
56
57
58
59
60
61
62
63
64
65
66
67
68
69
70
71
72
73
74
75
76
77
78
79
80
81
82
83
84
85
86
87
88
89
90
91
92
93
94
95
96
97
98
99
100
101
102
103
104
105
106
107
108
109
110
111
112
113
114
115
116
117
118
119
120
121
122
123
124
125
126
127
128
129
130
131
132
133
134
135
136
137
138
139
140
141
142
143
144
145
146
147
148
149
150
151
152
153
154
155
156
157
158
159
160
161
162
163
164
165
166
167
168
169
170
171
172
173
174
175
176
177
178
179
180
181
182
183
184
185
186
187
188
189
190
191
192
193
194
195
196
197
198
199
200
201
202
203
204
205
206
207
208
209
210
211
212
213
214
215
216
217
218
219
220
221
222
223
224
225
226
227
228
229
230
231
232
233
234
235
236
237
238
239
240
241
242
243
244
245
246
247
248
249
250
251
252
253
254
255
256
257
258
259
260
261
262
263
264
265
266
267
268
269
270
271
272
273
274
275
276
277
278
279
280
281
282
283
284
285
286
287
288
289
290
291
292
293

