联系作者

# 4.1 前端路由和服务端路由
# 4.1.1 前端路由和History API
# History API
提供操作控制浏览器会话历史,维护会话栈(Session stack)的能力
# history.go()
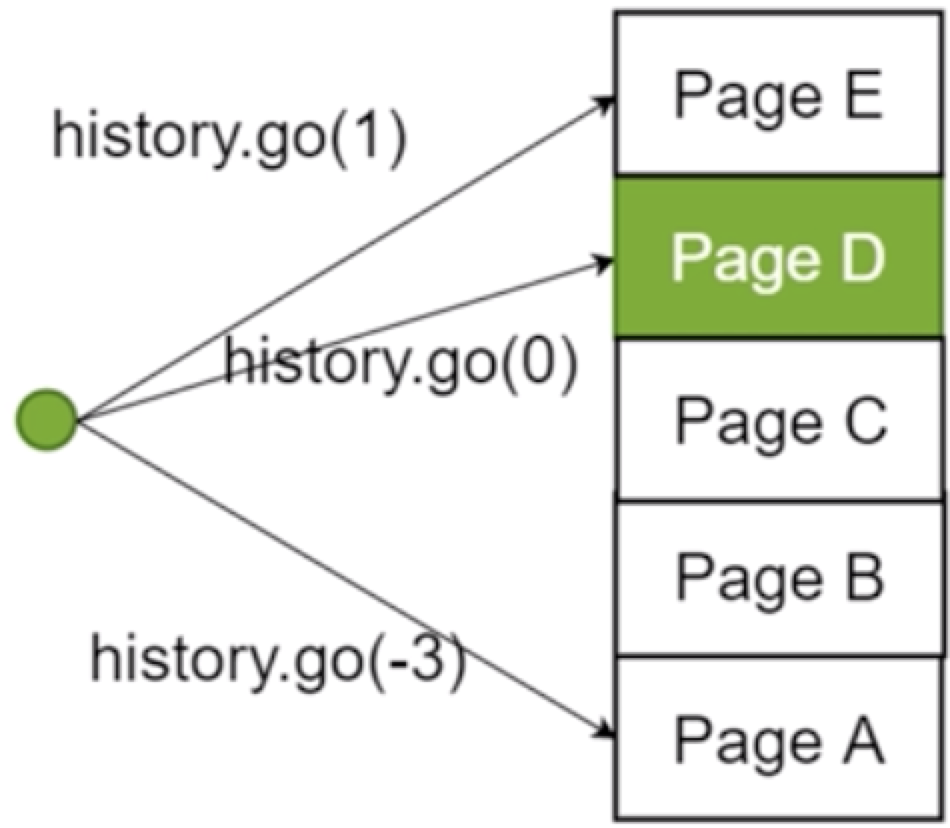
切换我们的会话栈,但并不改变我们的会话栈
# back & forward
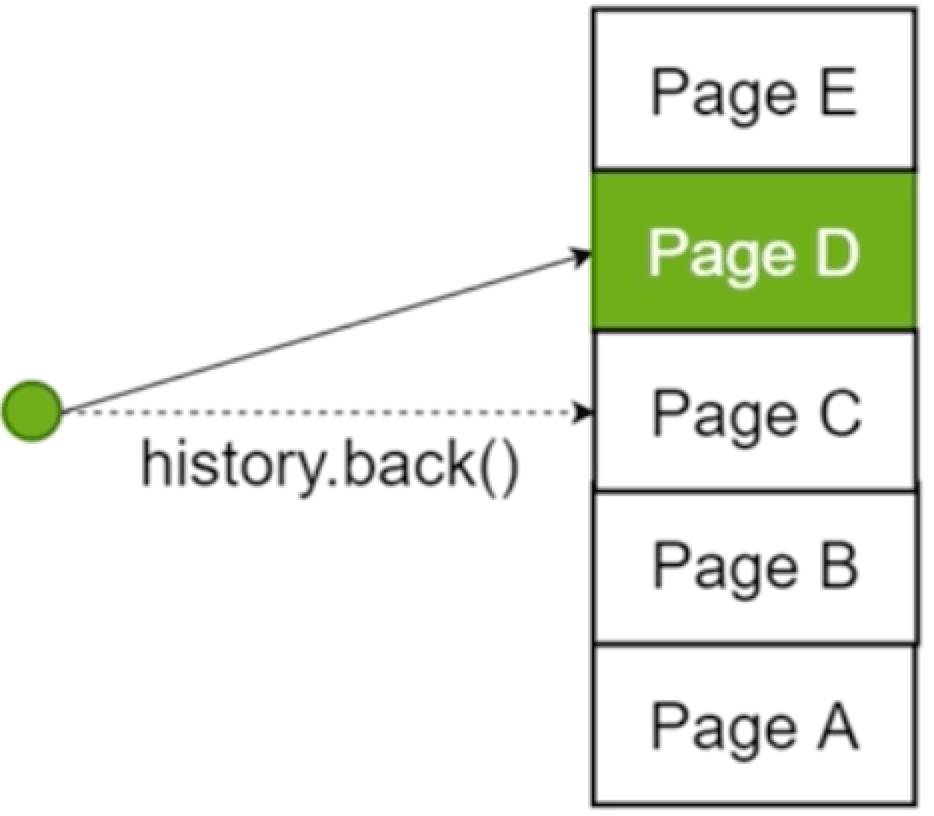
back相当于go(-1),forward相当于go(1)
# pushState(state,title,url)
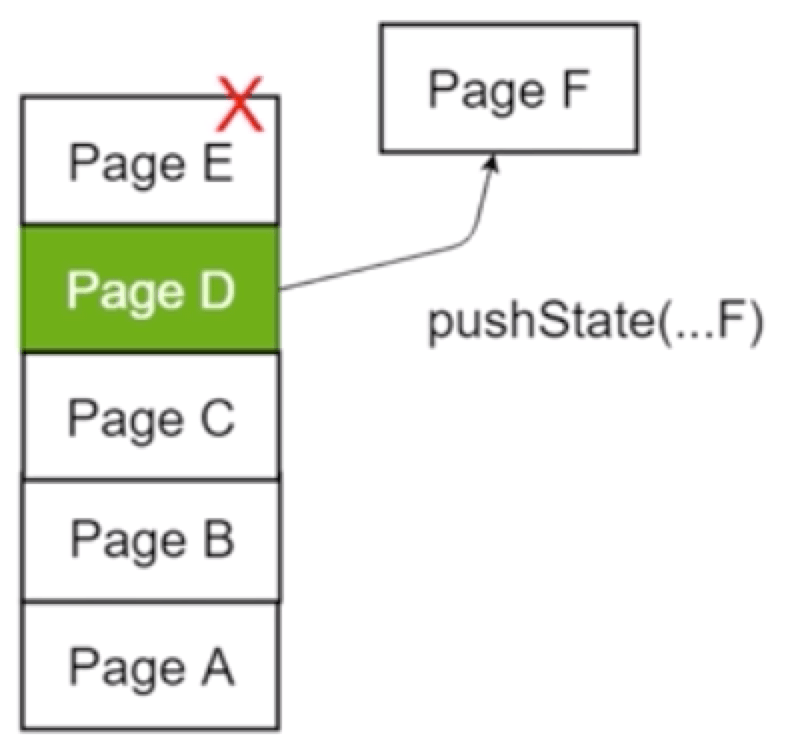
新增一个状态(State)到会话栈(session Stack)
- state:状态数据(自定义),可以通过history.state获取
- title:预留字段,多数浏览器不使用
- url:新状态的url
假如我们现在打开baidu.com网站,我们在控制台里输入以下内容
history.pushState(null,null,'/test')
// 发现页面并没有再次请求资源,我们就是利用这个能力去做单页面应用的

history.pushState({name:"demo1"},null,'/test')
// 第一个参数可以传递参数,可以用history.state拿到,可以用于区分页面
// history.pushState({name:"demo1"},null,'/test?name=demo1')跟query传递参数是一样的
2
3
4
5
6
有些垃圾网站当你打开后,你会发现按返回,一直返回不了,它们就是在你的会话栈中pushState很多次,它们push的url也不会导致页面变化,所以给人错觉进入这样的网站像中病毒一样,返回不了。
# pushState(state,title,url)
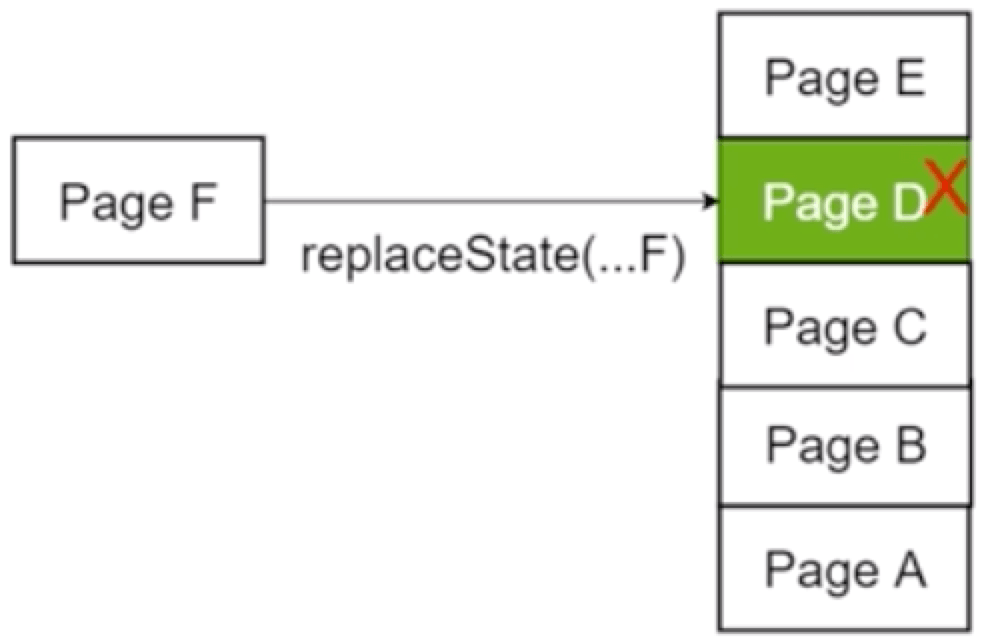
替换会话栈(session Stack)中当前的状态
- state:状态数据(自定义),可以通过history.state获取
- title:预留字段,多数浏览器不使用
- url:新状态的url
history.pushState(null,null,'/test1')
history.pushState(null,'/test2')

// 可以替换test1
history.replaceState(null,'/test3')
2
3
4
5
# 4.1.2 实战服务端路由
# 观察node.js实现服务端路由
源码地址:/Senior-FrontEnd/examples/computerNetwork/4.1
做的功能是当访问http://localhost:8080/details返回的是details.html,当访问http://localhost:8080/list返回的是list.html
const app = require('express')()
const path = require('path')
const fs =  require('fs')

// __dirname 当前文件相对目录
const pageDir = path.resolve(__dirname,'page')
const htmlFile = fs.readFileSync(pageDir)

function displayHtmlFile(name) {
    return (req,res)=>{
        const filePath= path.resolve(pageDir,name+".html")
        res.sendFile(filePath)
    }
}
htmlFile.forEach(file=>{
    const [name,ext] = file.split('.')
    app.get('/',name,displayHtmlFile(name))

})
app.listen(3000)
2
3
4
5
6
7
8
9
10
11
12
13
14
15
16
17
18
19
20
# 观察用Cluster启动后多个实例进行负载均衡
const cluster = require('cluster');
// 想知道机器上有多少cpu核心
const numCPUs = require('os').cpus().length
const express = require('express')

//cluster.isMaster 判断主进程还是从进程
if(cluster.isMaster) {
    console.log(`Master ${process.pid} is running`);

    // Fork workers
    for(let i=0;i<numCPUs;i++){
        cluster.fork() // 创建worker,又启动了几次次当前文件,不过进不了主进程了,上面又isMaster判断了
    }
    cluster.on('exit',(worker,code,signal)=>{
        console.log(`worker${worker.process.pid} died`)
    })
}else {
    // Worker can share any TCP connection
    // in this case it is an HTTP server
    // 把所有的进程都监听8888
    const app =  new express()
    app.listen(8888)
    console.log(`Worker${process.pid} started`)
}
2
3
4
5
6
7
8
9
10
11
12
13
14
15
16
17
18
19
20
21
22
23
24
# 4.1.3 实战一个但页面应用
- 服务端怎么做?
const app = require('express')()
const path =  require('path')

const htmlFile =  path.resolve(__dirname, "page/spa.html")
// 请求products 或者product/123 都访问spa.html
app.get(/\/product(s|\/\d+)/,(req,res)=>{
    res.sendFile(htmlFile)
})

app.listen(3000)
2
3
4
5
6
7
8
9
10
- 前端怎么做?
<!DOCTYPE html>
<html lang="en">
<head>
    <meta charset="UTF-8">
    <meta http-equiv="X-UA-Compatible" content="IE=edge">
    <meta name="viewport" content="width=device-width, initial-scale=1.0">
    <style>
        a {
            color : skyblue;
            cursor: pointer
        }
    </style>
    <title>Document</title>
</head>
<body>
  <h2>单页面应用示例</h2>
  <div id="content"></div>

  <ul>
      <li><a onclick="route('/products')">列表</a></li>
      <li><a onclick="route('/product/123')">详情</a></li>
  </ul>

  <script>
      // 更新列表的函数
      function pageList (){
          const html = `
          <ul>
            <li>Apple</li>
            <li>TicTok</li>
            <li>Alibaba</li>
          </ul>
          `
        document.getElementById('content').innerHTML =  html
      }
    //  更新详情的函数
      function pageDetail() {
          document.getElementById('content').innerHTML = "DETAIL"
      }

   // 实现页面切换并加入记录
      function route (page) {
        history.pushState(null,null,page)
        matchRoute(pages,window.location.href)
      }

      const pages = [
          {
              match: /\/products/,
              route: pageList
          },
          {
              match : /\/product\/\d+/,
              route: pageDetail
          }
      ]

      // 监听浏览器前进回退按钮,实现页面渲染
     window.onpopstate= function() {
        matchRoute(pages,window.location.href)
     }
     // 匹配当前页面
      function matchRoute(pages,href) {
        const page =  pages.find(page=>page.match.test(href))
        page.route()
      }
      matchRoute(pages,window.location.href)
  </script>
</body>
</html>
2
3
4
5
6
7
8
9
10
11
12
13
14
15
16
17
18
19
20
21
22
23
24
25
26
27
28
29
30
31
32
33
34
35
36
37
38
39
40
41
42
43
44
45
46
47
48
49
50
51
52
53
54
55
56
57
58
59
60
61
62
63
64
65
66
67
68
69
70
# 4.2 Session&Cookie&Storage和单点登录
# 4.2.1 Session和Storage
# 登录场景(理解Session和Cookie)
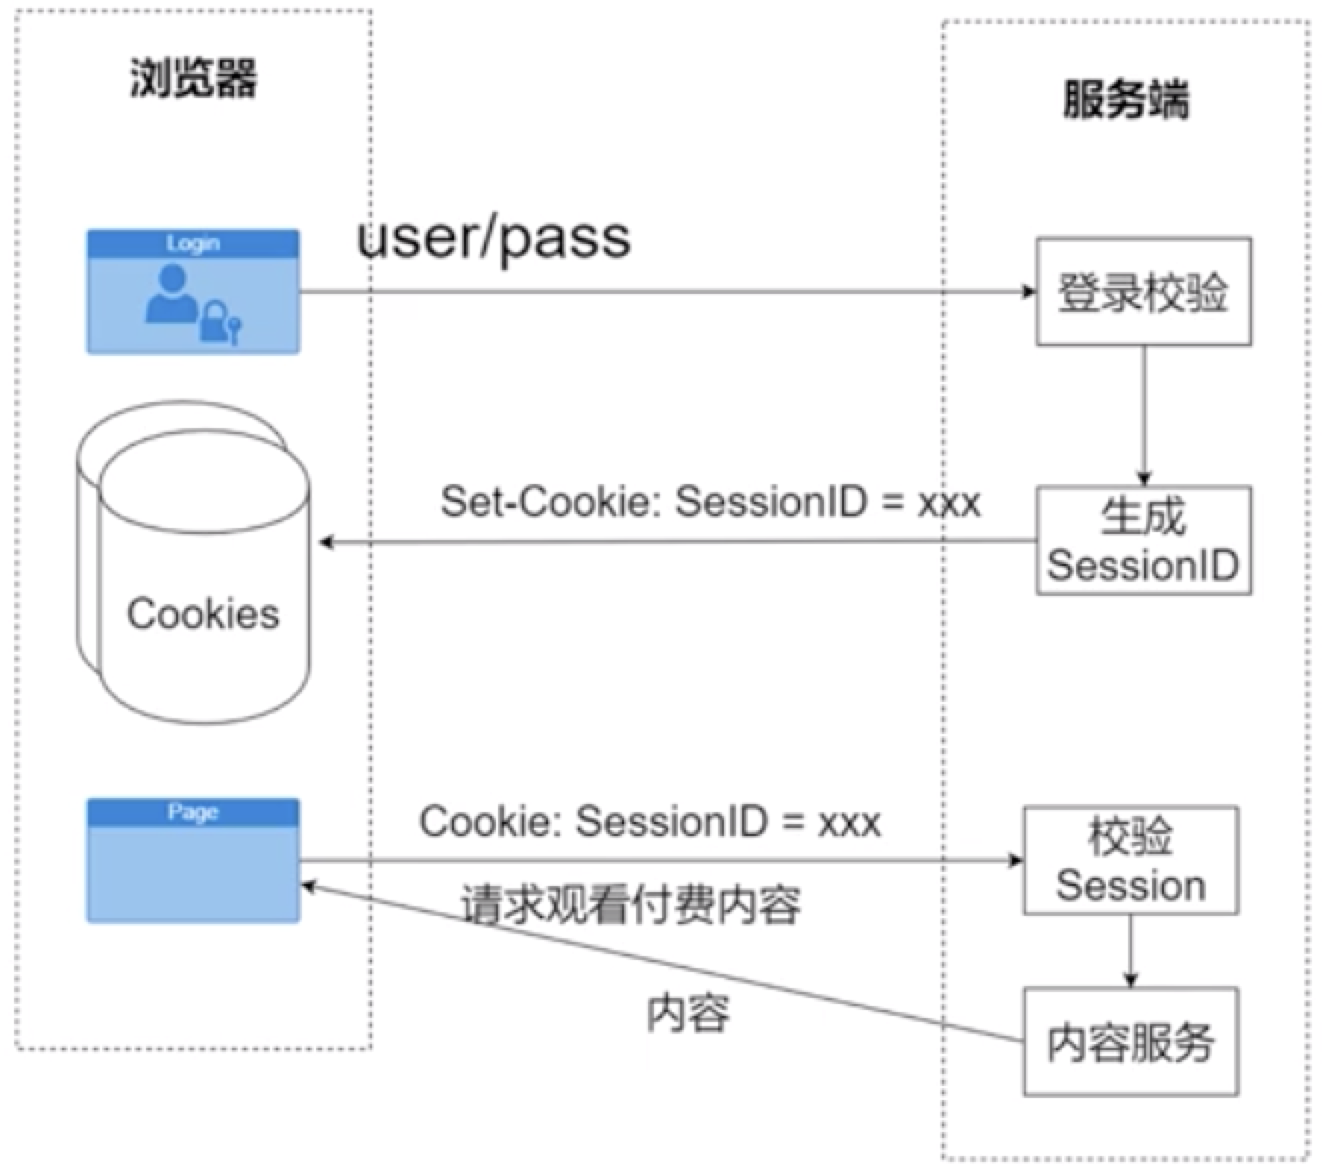
- Session 代表一次会话
- SessionID 是这一次会话的唯一标识
- Cookie 是浏览器用于存储少量数据的存储手段
# 实战Session/Cookie-1
- 观察浏览器发出请求,服务端返回cookie
- 观察Set-Cookie在跨域情况下会发生什么
const express =  require('express')
const app1 = express()

app1.set('etag',false)
app1.get('/',(req,res)=>{
    res.setHeader('Set-Cookie','abc=123')
    res.send('ok')
})
app1.listen(3000)
2
3
4
5
6
7
8
9
nodemon ./cookie.js
为了后面演示方便我们用whistle做代理服务;
whistle怎么用过?可以参考:跳转地址
基础工具链第5个类型
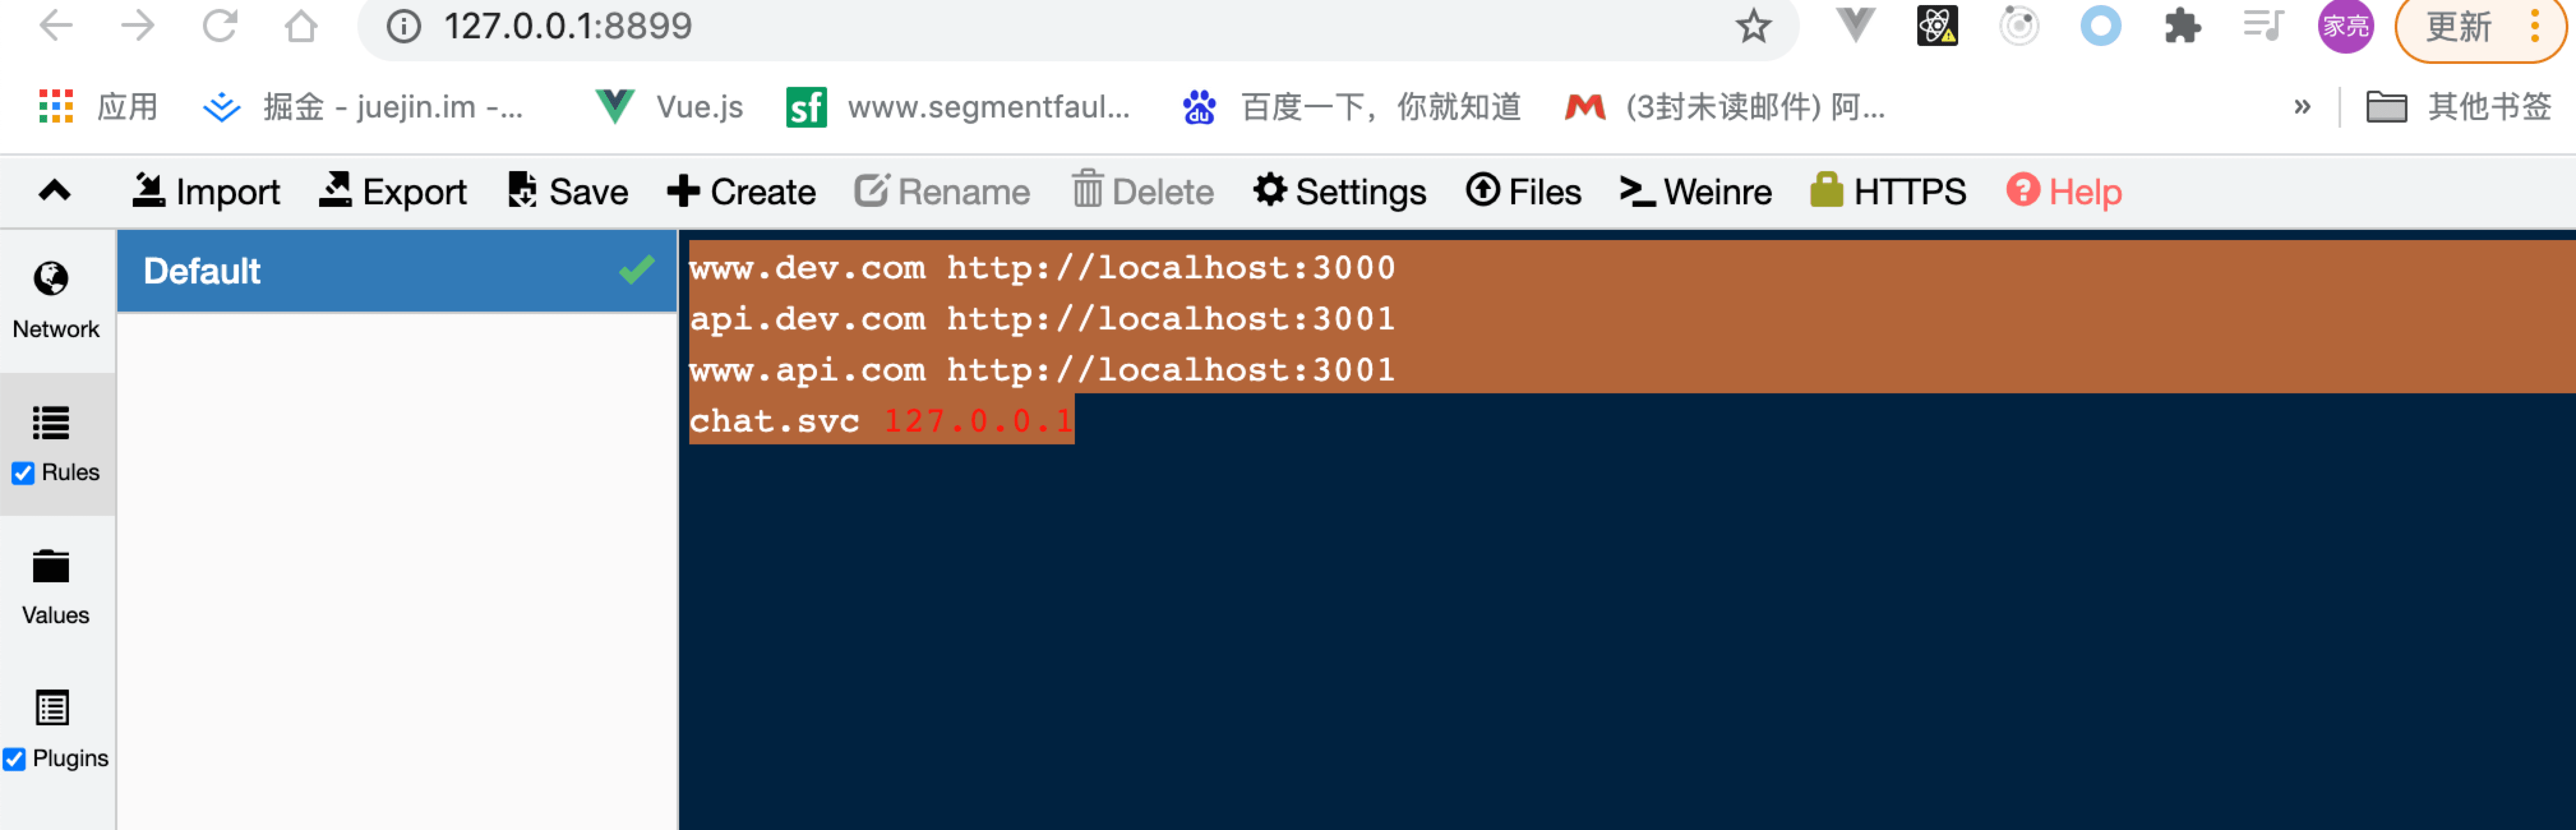
从上图可以看出,我们配置了3个域名,分别代理到本地服务
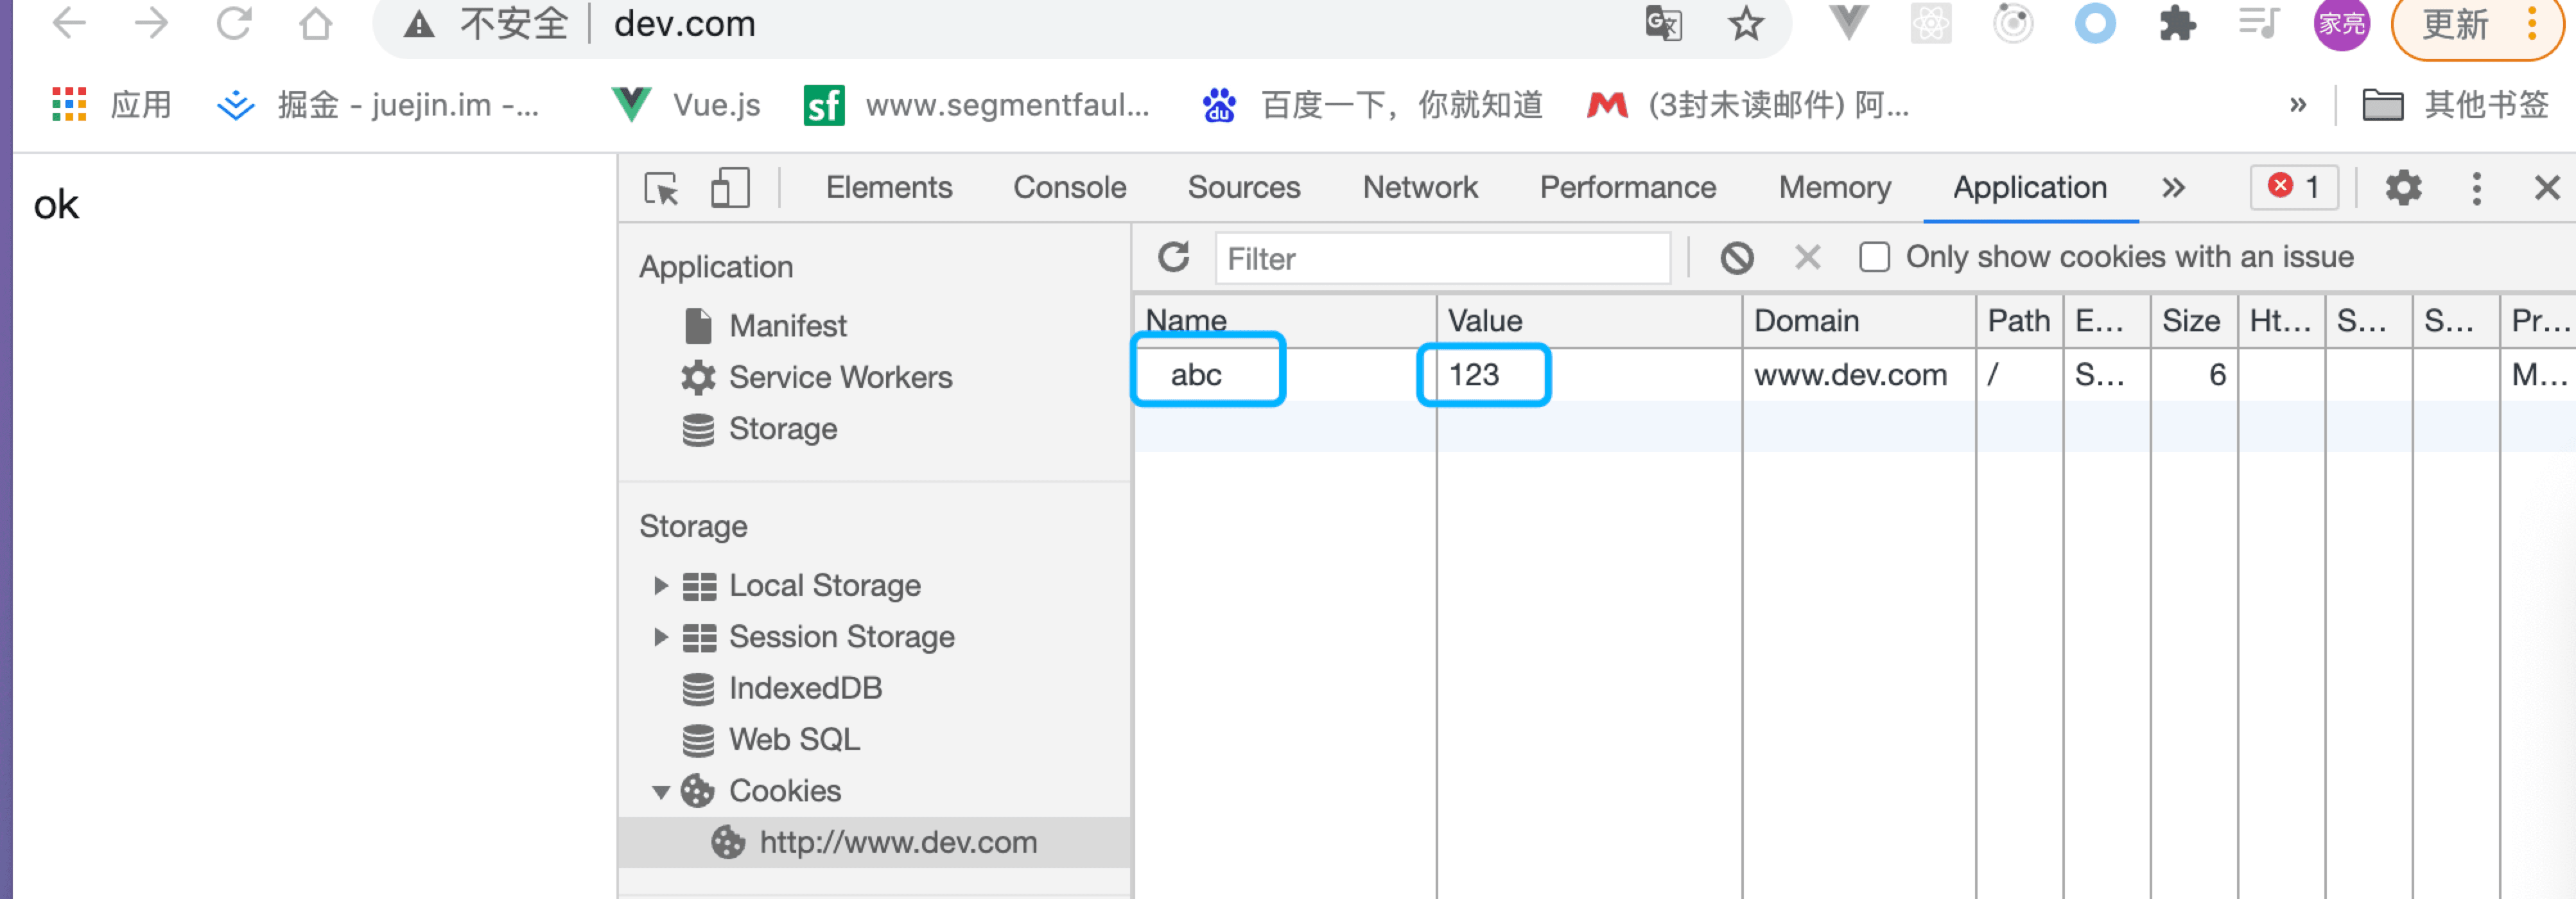
我们在chrome浏览器上访问http://www.dev.com/,就可以访问本地启动的3000端口的服务了,可以在Cookies里看见我们刚刚设置的cookie:apc=123;
cookie也是受同源策略限制的,只有同域名下才能访问我们设置的cookie,如果没有设置失效时间,就会一直在。
# 实战Session/Cookie-2 重要
我们在dev.com下请求api.dev.com看看会发生什么?
const express =  require('express')
const app1 = express()
+ const app2 = express()

app1.set('etag',false)
app1.get('/',(req,res)=>{
    res.setHeader('Set-Cookie','abc=123')
    res.send('ok')
})

+ app2.get('/',(req,res)=>{
+ res.setHeader('Set-Cookie','apc=123')
+ res.setHeader(
+   "Access-Control-Allow-Origin",
+    "http://www.dev.com"
+)
+ res.send('ok')
+ })
app1.listen(3000)
+ app2.listen(3001)
2
3
4
5
6
7
8
9
10
11
12
13
14
15
16
17
18
19
20
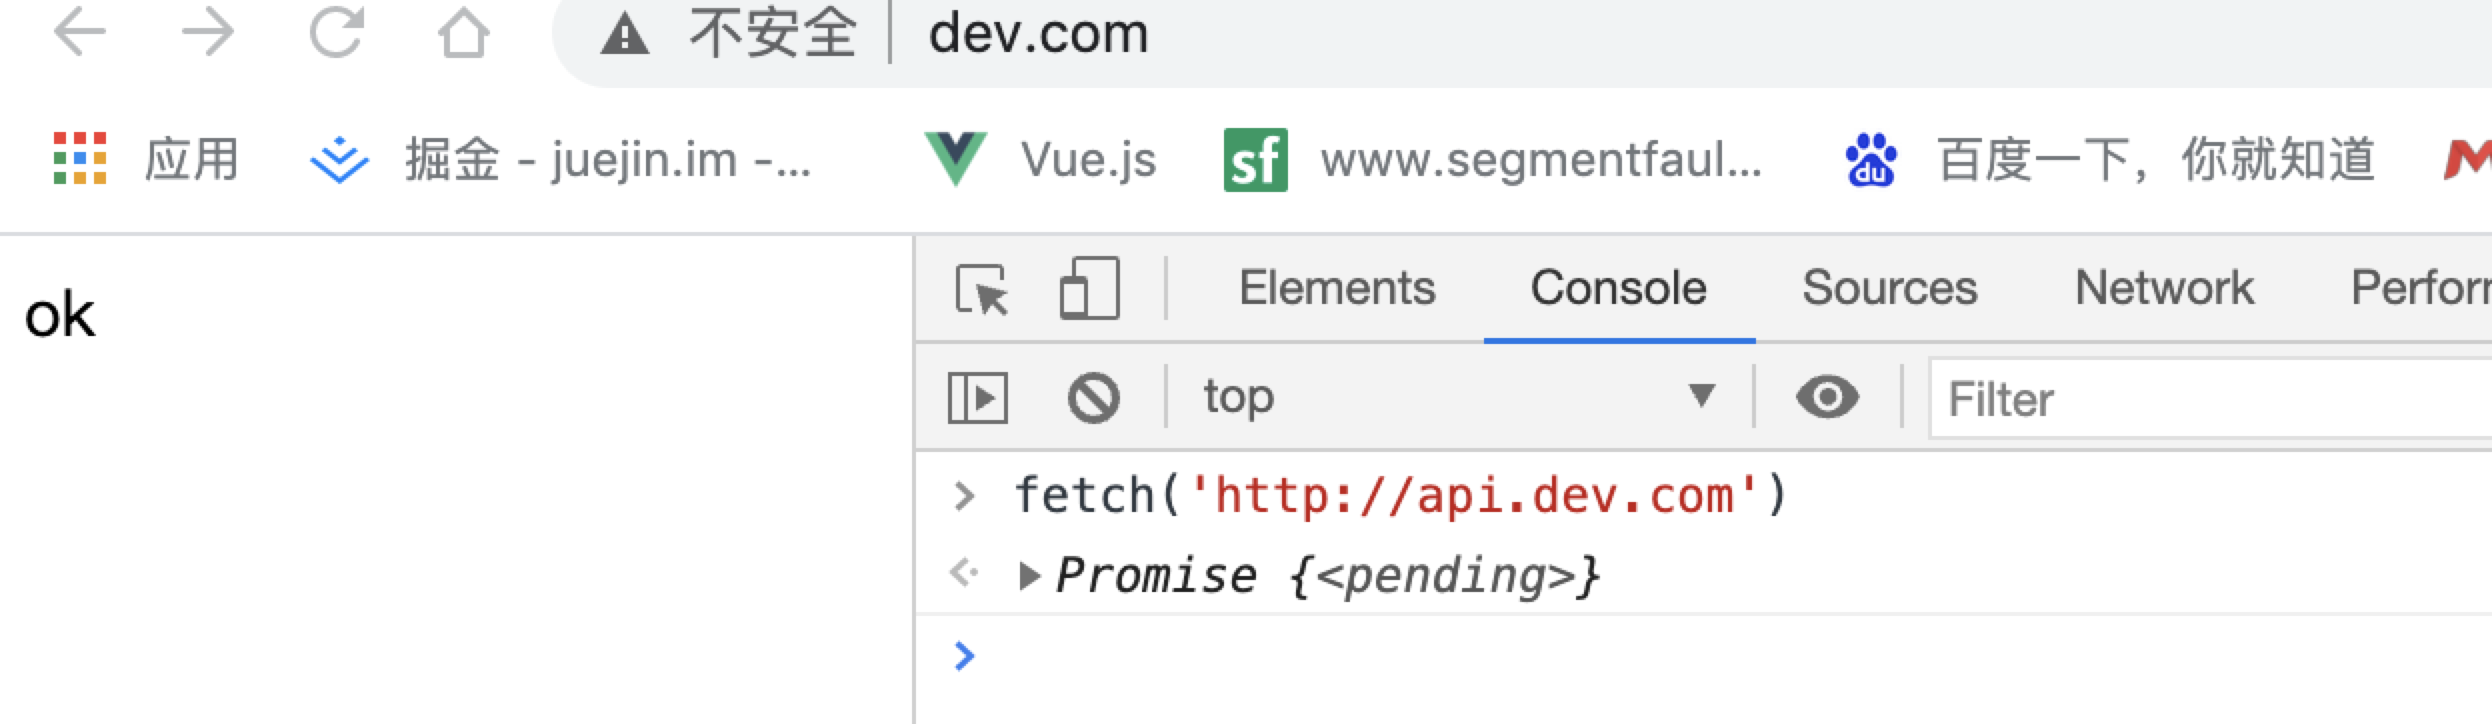
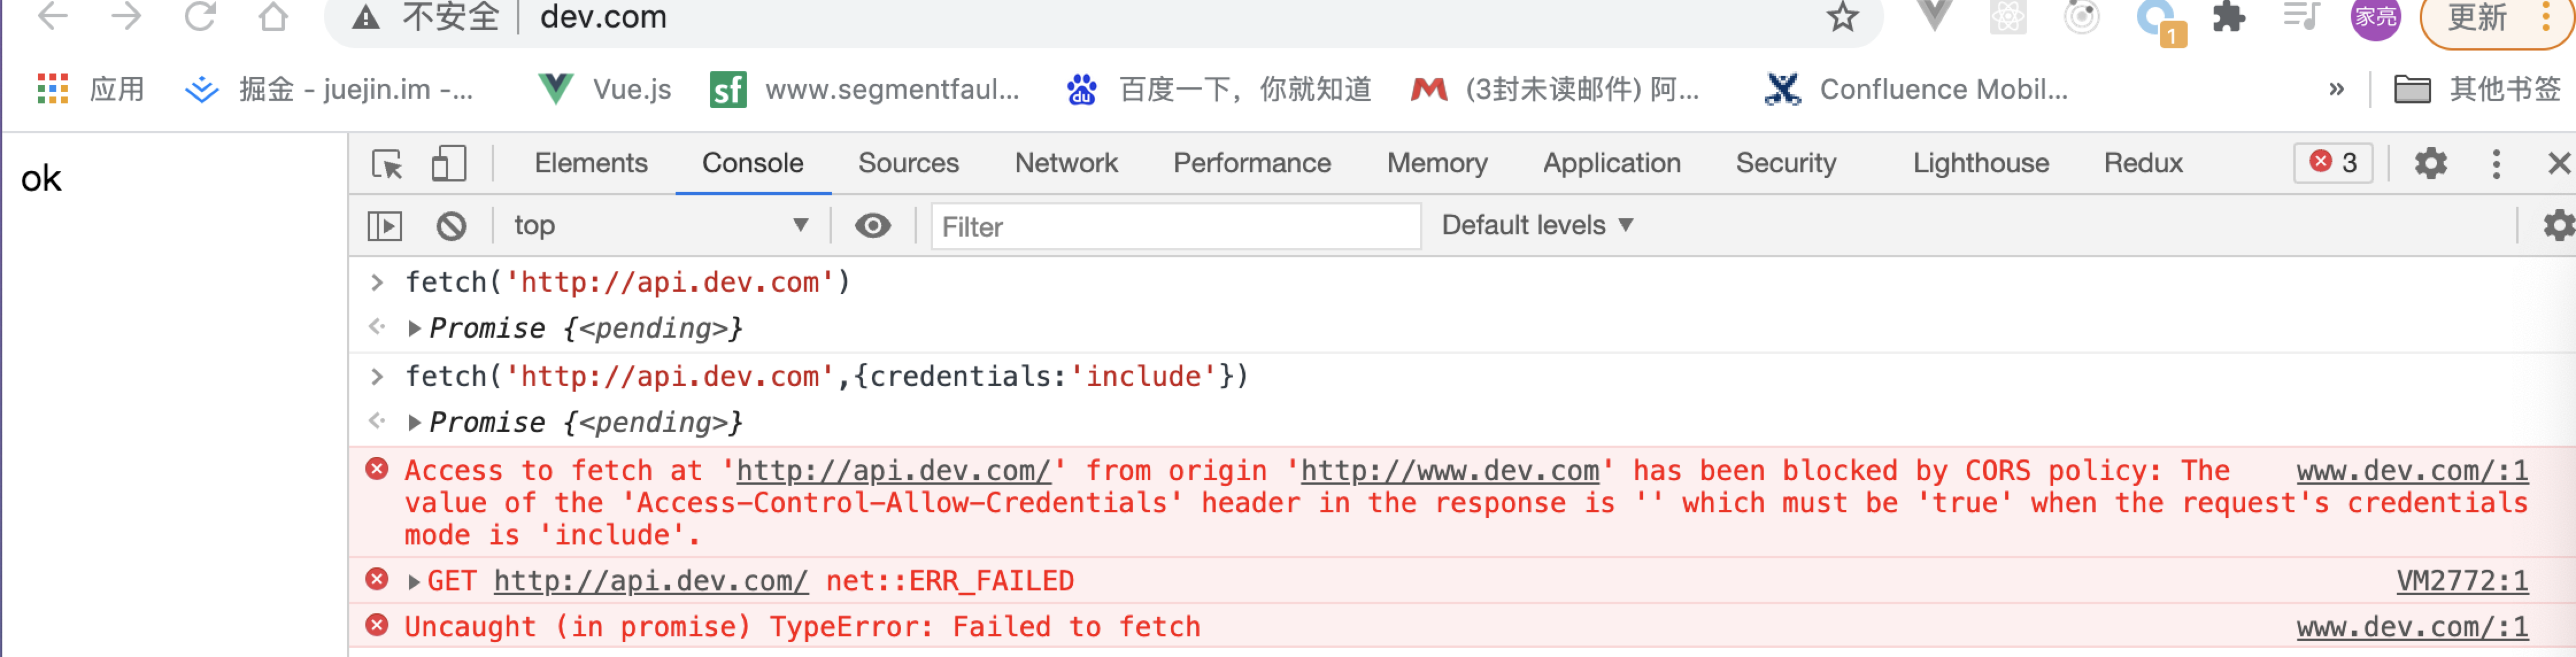
api.dev.com是dev.com的二级域名,受同源策略限制,我们通过设置Access-Control-Allow-Origin允许在api.dev.com跨域请求,虽然请求通了,但我们发现请求头里没有携带cookie,这是因为只有同源的情况下才会自动携带cookie。那怎么在不同源的情况下携带cookie呢?
可以在请求参数里加上{credentials:'include'},不过你又会发现下面报错了,它希望服务端加上Access-Control-Allow-Credentials
const express =  require('express')
const app1 = express()
const app2 = express()

app1.set('etag',false)
app1.get('/',(req,res)=>{
    res.setHeader('Set-Cookie','abc=123')
    res.send('ok')
})


app2.get('/',(req,res)=>{
 res.setHeader('Set-Cookie','apc=123')
 res.setHeader(
     "Access-Control-Allow-Origin",
     "http://www.dev.com"
 )
+ res.setHeader(
+    "Access-Control-Allow-Credentials",
+    "true"
+ )
 res.send('ok')
})
app1.listen(3000)
app2.listen(3001)
2
3
4
5
6
7
8
9
10
11
12
13
14
15
16
17
18
19
20
21
22
23
24
25
总结
cookie也受同源策略限制,同源才会自动携带cookie,不同源需要添加Credentials
# 实战Session/Cookie-3 重要
我们在dev.com下请求api.com看看会发生什么?
因为2个域名属于不同的主域名,如果想让请求api.com时候携带dev.com下的cookie需要满足以下2个条件
- 必须是https协议
- SameSite=None;Secure
const express =  require('express')
const app1 = express()
const app2 = express()

app1.set('etag',false)
app1.get('/',(req,res)=>{
+    res.setHeader('Set-Cookie','abc=123;SameSite=None;Secure')
    res.send('ok')
})


app2.get('/',(req,res)=>{
 res.setHeader('Set-Cookie','apc=123')
 res.setHeader(
     "Access-Control-Allow-Origin",
     "http://www.dev.com"
 )
 res.setHeader(
    "Access-Control-Allow-Credentials",
    "true"
)
 res.send('ok')
})
app1.listen(3000)
app2.listen(3001)
2
3
4
5
6
7
8
9
10
11
12
13
14
15
16
17
18
19
20
21
22
23
24
25
# 其他浏览器存储
| ccokie | Local storage | Session Storage | |
|---|---|---|---|
| 容量 | 4kb | 10mb | 5mb |
| 作用域 | 同源 | 同源 | 当前网页 |
| 过期时间 | 手动 | 永久 | 当前网页关闭 |
| 位置 | 浏览器/服务端 | 浏览器 | 浏览器 |